1번의 경우 개발시에 웹 서버를 별도로 셋팅하기 번거로울 경우 쉽게 사용할 수 있는 방법이고, 실제로 흔히 사용한다. 그러나 편의상 사용되며 성능과는 거리가 멀다. 따라서 여기서는 더 이상 언급하지 않기로 한다.
2번의 경우 10 여년 이상 사용해온 전통적인 방식이며LAMP 스택(Linux, Apache, MySQL, PHP)이란 이름으로 지금의 아파치와 PHP 를 있게 한 장본인이다.
3번의 경우 PHP-FPM 과 함께 최근에 주로 쓰이는 방식인데, FPM 은 FastCGI Process Manager 의 약자이며 PHP-FPM 은 PHP FastCGI 의 대안 구현으로 2010년 PHP 코어에 팩키징되고 2011년 실험적인(experiment) 딱지를 뗌으로써 사실상 PHP FastCGI 표준 구현으로 자리 잡았다. 특히 아파치에 비해 월등한 성능을 보이는 Nginx 와 손쉽게 연동되며 최근LEMP 스택(Linux, Nginx, PHP, MySQL/MariaDB)이란 이름으로 새로운 트렌드를 주도하고 있다.
그렇다면 3번 구현은 과연 새로운 트렌드로써 월등한 성능을 보여주고 있는지 직접 확인해보도록 한다.
테스트
테스트 서버의 사양은 아래와 같다.
Intel Xeon E312xx (Sandy Bridge) x 2
4G RAM
OS: Ubuntu 14.04
Apache, Nginx 모두 apt 를 이용한 기본 설치, 설정 변경 없음
요즘 기준으로 보면 웹 서버로 쓸 수 있는 거의 최소 사양인데 테스트 PHP 코드가 과연 얼만큼의 성능을 보여주는지 확인해본다.
성능
코드는 간단한 HTML 을 변수에 삽입한 다음 템플릿을 구성해서 내려주는 형태이며, 별도의 외부 서버나 DB 호출은 하지 않는다.
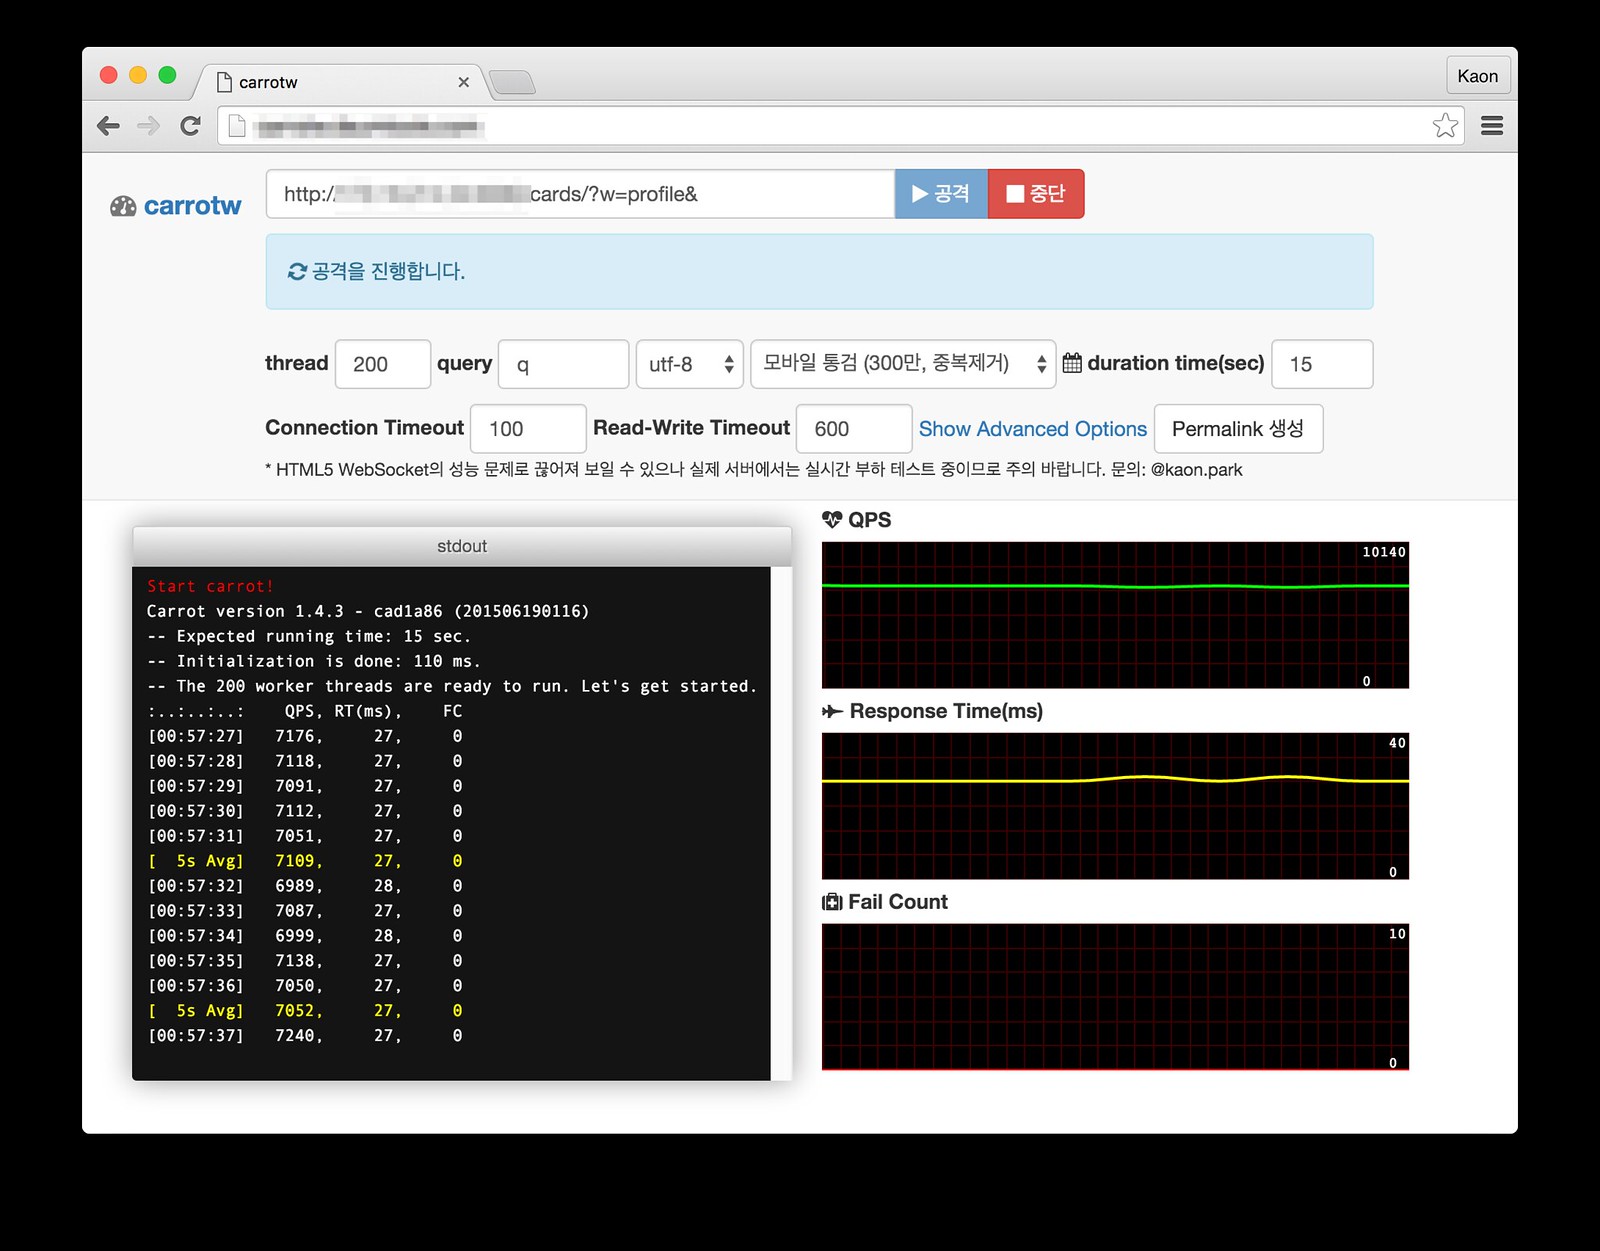
carrotw는 사내에서 만든 브라우저로 직접 부하 테스트가 가능한 성능 테스트 도구(외부에 공개되지 않은 사내 시스템이라 부득이하게 주소를 가림)다. 전통적인 쓰레드 방식으로 동작하며 여기서는 쓰레드를 200개 주어 최대 성능을 측정했다. 200개 쓰레드가 동시에 요청을 보내 응답을 받아오는 초당 평균 횟수/속도를 측정하는 방식이며 10초간 측정한 결과는 약 7,600 TPS 에, 평균 응답속도 25ms 수준이다.
아주 좋은 성능의 서버가 아님에도 불구하고 초당 7,600회 처리라는 준수한 성능을 보여준다. 그렇다면 과연 아파치는 Nginx 에 비해 어느 정도 성능이 나오는지 확인해본다.
동일한 200개 쓰레드에서 7,100 TPS, 27ms 가 나왔다. 이를 표로 정리하면 아래와 같다.
방식TPS응답 속도
Nginx w/ FastCGI
7,600 TPS
25ms
Apache w/ mod_php
7,100 TPS
27ms
단순 TPS 만 비교하면 Nginx 가 아파치 보다 약 7% 정도 성능이 더 좋은것으로 나온다. CSS, JS 등의 Static 파일이 압도적인 성능을 보여주는 것에 비하면 성능이 약간 높긴 하나 다소 실망스런 결과다.
따라서 CGI(PHP) 용도로 아파치나 Nginx 나 별 차이가 없다는 결론에 이른다. 그러나 전통적인 CGI(Traditional CGI) 방식과는 압도적인 성능 차이가 있음에 유의해야 한다. 아래는 여러가지 언어로 전통적인 CGI 를 구현하고 아파치 cgi-bin 에서 구동한 결과다.
방식TPS코드
Bash
870 TPS
Python
190 TPS
C
1,580 TPS
C++
1,100 TPS
PHP
250 TPS
예상했듯이 C 가 가장 빠르고 그 다음 C++ > Bash > PHP > Python 순이다. 전통적인 CGI 방식은 프로세스를 직접 실행한 결과를 보여주는 방식이기 때문에 미리 바이너리를 만들고 사이즈가 가장 작은 C 가 가장 빠르다.
그러나 이 역시도 mod_php 에 비하면 1/7 수준에 불과하다. 따라서 특수한 경우를 제외하곤 굳이 C 로 전통적인 CGI 를 만들어야 할 이유가 전혀 없다. 재밌는 점은 PHP 의 경우인데, 전통적인 CGI 에서는 250 TPS 밖에 나오지 않지만 mod_php/FastCGI 에서 돌리면 7,100 ~ 7,600 TPS 가 나온다. 거의 30배 이상 성능 차이가 난다.
결론
Static 파일과 달리 CGI(PHP) 방식에서 Apache w/ mod_php 와 Nginx w/ FastCGI 의 성능 차이는 크지 않다. 따라서 각자에게 편한 웹 서버를 사용해도 무방하다. 그러나 전통적인 CGI 방식과는 성능 차이가 매우 크므로 특수한 경우를 제외하곤 전통적인 CGI 방식은 사용하지 않는게 좋다.
UI 를 구현하게 되면서, 앵귤러만의 문법같은 것들이 다양하게 존재합니다. 특정 기능을 구현 할 때, 편리하게 대신 해주는 것들이 많습니다. 라우터, HTTP 클라이언트 등 웹 프로젝트에서 필요한 대부분의 도구들이 프레임워크 안에 내장되어 있습니다. 앵귤러1의 경우 만들어진지 꽤 오래 됐고, 기업에서 많이 사용이 돼서, 유지보수하고 있는 프로젝트가 많아서 사용률이 높은 편입니다. 앵귤러2의 경우 매우 성숙하긴 하지만, 인지도 측면에선 아직 성장하는 단계이며, 주로 타입스크립트랑 함께 사용됩니다.
2. Angular
“컴포넌트” 라는 개념에 집중이 되어있는 라이브러리입니다. 컴포넌트는 우리가 추후 더 자세히 배워보겠지만, 미리 간단히 설명하자면, 데이터를 넣으면 우리가 지정한 유저 인터페이스를 조립해서 보여줍니다. 페이스북 개발자들이 라이브러리의 성능과 개발자 경험을 개선하기 위해 많은 연구를 합니다. 리액트를 한번 해본 개발자들은 대부분 맘에 들어합니다. 생태계가 엄청 넓고, 사용하는 곳도 많습니다. HTTP 클라이언트, 라우터, 심화적 상태 관리 등의 기능들은 내장되어있지 않습니다. 따로 공식 라이브러리가 있는 것도 아니여서, 개발자가 원하는 스택을 맘대로 골라서 사용 할 수 있습니다 (혹은 직접 라이브러리를 만들어서 쓸 수도 있겠죠.)
3. Vue
입문자가 사용하기에, 정말 쉽습니다. 대부분 Webpack 같은 모듈 번들러를 사용하여 프로젝트를 구성해야하는 앵귤러와 리액트와 달리, 단순히 CDN 에 있는 파일을 로딩 하는 형태로 스크립트를 불러와서 사용하기도 편합니다. HTML 을 템플릿처럼 그대로 사용 할 수도 있어서 마크업을 만들어주는 디자이너/퍼블리셔가 있는 경우 작업 흐름이 매우 매끄럽습니다. 공식 라우터, 상태관리 라이브러리가 존재합니다.
동작방식
Virtual DOM 의 변화가 일어나면 화면에도 변화가 일어난다.
"Javascript based Virtual DOM" 으로 렌더링 => 실제 DOM 비교 => 필요한 곳 업데이트
( 실제 DOM 을 재 작성하면 부하가 너무 크다. )
골자) 변화된 최종본을 React에 넘기면 React 가 변화를 감지하여 실제 화면에 반영한다.
Webpack 과 Babel 같은 도구들이 자바스크립트 런타임인 Node.js 를 기반으로 만들어져있습니다. 그렇기에 해당 도구들을 사용하기 위해서 Node.js 를 설치합니다.
v8
Homebrew
( 맥 사용자 )
윈도우 사용불가하며, Scoop 패키지를 사용하면 Yarn 설치가 가능.
애플에서 제공하지 않는 유용한 패키지를 설치할 때 사용되는 패키지 관리자이다. 간혹 NPM으로 리액트 & 리액트 네이티브 관련 외부 패키지를 설치할 때 문제가 발생될 수 있다. 이때는 NPM 대신 Yarn 패키지를 사용하는 것을 권장한다.
Yarn ( 맥 사용자 )
Yarn은 페이스북에서 만든 새로운 자바스크립트 패키지 매니저이다. 이미 거대화된 NPM보다 속도 측면에서 빠르다는 장점이 있다. Yarn은 Homebrew로 설치할 수 있다. ( 필자의 경우 Yarn으로 리액트와 리액트 네이티브 외부 패키지를 설치하고 있다. )
Yarn 은 조금 개선된 버전의 npm 이라고 생각하시면 됩니다. npm 은 Node.js 를 설치하게 될 때 같이 딸려오는 패키지 매니저 도구입니다. 프로젝트에서 사용되는 라이브러리를 설치하고 해당 라이브러리들의 버전 관리를 하게 될 때 사용하죠. 우리가 Yarn 을 사용하는 이유는, 더 나은 속도, 더 나은 캐싱 시스템을 사용하기 위함입니다.
Webpack
리액트 프로젝트는 컴포넌트를 여러가지 파일로 분리해서 저장하며, 이 컴포넌트는 일반 자바스크립트가 아닌 JSX 라는 문법으로 작성한다.
이 여러가지 파일을 한개로 결합하기 위해서 우리는 Webpack 이라도 도구를 사용한다.
Babel
JSX 를 비롯한 새로운 자바스크립트 문법들을 사용하기 위해서는 Babel 이라는 도구를 사용한다.
리액트 컴퍼넌트 구조
( 아래 그림과 같음 )
설명
index.html
<div id="root"></div>
index.js
import React from 'react'; import ReactDOM from 'react-dom'; import './index.css'; import App from './App'; import registerServiceWorker from './registerServiceWorker';
import React, { Component } from'react'; import logo from'./logo.svg'; import'./App.css';
classAppextendsComponent { render() { return ( <divclassName="App"><headerclassName="App-header"><imgsrc={logo}className="App-logo"alt="logo" /><h1className="App-title">Welcome to React</h1></header><pclassName="App-intro"> To get started, edit <code>src/App.js</code> and save to reload. </p></div> ); } } export default App;
클래스의 정의 및 Call
설명
정의
import React, { Component } from 'react';
class MyName extends Component { render() { return (
4. 여러 프로세스에서 동시에 같은 key에 대한 갱신을 요청할 경우, Atomic 처리로 데이터 부정합 방지 Atomic처리 함수를 제공
5. 메모리를 활용하면서 영속적인 데이터 보존
- 명령어로 명시적으로 삭제, expires를 설정하지 않으면 데이터가 삭제되지 않는다.
- 스냅샷(기억장치) 기능을 제공하여 메모리의 내용을 *.rdb 파일로 저장하여 해당 시점으로 복구할 수 있다.
6. Redis Server는 1개의 싱글 쓰레드로 수행되며, 따라서 서버 하나에 여러개의 서버를 띄우는 것이 가능하다.
- Master - Slave 형식으로 구성이 가능함
Server 실행
redis-server
Clien 실행
redis-cli
Server Alive Check
ping
DATATYPE.String
- String은 일반적인 Text문자열이며, key와 value가 각각 하나씩인 일대일 관계(유일)
- Text형태만 저장할 수 있는것이 아니라, binary safe string 이다.
- 이것이 의미하는 것은 JPEG 이미지나 숫자 알파벳 등을 사용할 수도 있다는 것이다.
- key와 value 모두 넣을 수 있는 최대 길이는 512MB이다.
- key는 너무 길면 찾기 어렵고, 불필요한 메모리 소모가 일어난다.
- key는 너무 짧으면 뭔지 해독하기 쉽지 않으므로 알맞게 하도록 하자.
- key를 구성할때 단어 사이에 구분자를 사용하는 것이 좋습니다.
예를 들어 ':', '-' 등을 사용해서 key를 구성하면 쉽게 알아볼 수 있습니다.
- set, get command
DATATYPE.Lists
- 일반적인 배열로 생각하면 된다.
- List는 key 1개에 n개의 value를 갖는다. (단, 중복된 값 저장 가능함)
- 입력된 데이터값은 입력된 순서대로 순차적으로 저장 및 처리된다.
- 주로 큐(Queue)와 스택(Stack)으로 사용된다.
- 한 key에 담을 수 있는 최대 갯수는 4,294,967,295개(2^32 - 1개) - LPUSH, LPOP, RPUSH, RPOP Command
DATATYPE.Sets
- Group 형태로 key 1개에 n개의 값을 갖는다. (단, 중복된 값 허용하지 않음)
- 입력된 순서와 상관없이 저장되는 정렬되지 않은 집합형이다.
- '집합'이기 때문에 한 key에 중복된 데이터는 존재할 수 없다.
- 즉, 동일한 key에 같은 값 value A가 두 번 추가된다면 값은 하나만 존재하게 된다.
- 한 key에 담을 수 있는 최대 갯수는 4,294,967,295개(2^32 - 1개)
- Set의 경우 집합 연산을 제공한다. 합집합, 교집합, 차집합을 할 수 있다.
- Sets에서는 집합이라는 의미에서 value를 member라 부른다.
명령어 SADD : 데이터를 저장하기 위한 명령어.
DATATYPE.Sorted sets
- key 하나에 여러개의 score와 value로 구성된다.
- Sets과 마찮가지로 중복된 데이터는 허용하지 않는다.
동일한 키에 값을 여러번 추가해도 하나만 존재하게 된다.
- Set에 'score'라는 필드가 추가된 데이터형이다.
- score로 데이터 값(value)의 순서를 정렬(sort)한다.
- score가 같다면 데이터 값(value)으로 정렬(sort)한다.
- 정렬된 데이터가 필요한 경우 Sorted Set 데이터형을 사용한다.
DATATYPE.Hashs
- Hashes의 경우 key 하나에 여러개의 field와 value 쌍으로 구성된다.
Hashes VS Table 공통점 1. Hashes가 필드(field)와 값(value)로 구성된다는 점은 RDB의 table과 비슷하다. 2. Hash key는 table의 PK, field는 column, value는 value로 생각하면 비슷하다. 3. Key가 PK와 같은 역할을 하기떄문에 Key 하나는 table의 하나의 row와 같다.
Hashes VS Table차이점 1. Table의 column 수는 일반적으로 제한이 있다. 하지만, Hashes의 field의 수는 40억개로 거의 무제한에 가깝다.
2. Table에서 column을 추가하려면 alter문으로 미리 table을 변경해야 하지만,
Ex> value = model.objects.order_by('-pk') # 내림차순 정렬 value = model.objects.order_by('pk') # 오름차순 정렬
GROUP BY
Syntax> Aggregate
Ex>
from django.db.models import Max value = model.objects.aggregate(temp_name=Max('pk')) # temp_name은 사용자가 임의로 정할 수 있음 print(value['temp_name'])
Ex2>
from django.db.models import Max from django.db.models.functions import Coalesce value = model.objects.aggregate(temp_name=Coalesce(Max('pk'),10000)) # temp_name은 사용자가 임의로 정할 수 있음 print(value['temp_name'])
// NuGet: Selenium.WebDriver.ChromeDriver
using OpenQA.Selenium.Chrome;
IWebDriver driver = new ChromeDriver();
// NuGet: Selenium.Mozilla.Firefox.Webdriver
using OpenQA.Selenium.Firefox;
IWebDriver driver = new FirefoxDriver();
// NuGet: Selenium.WebDriver.PhantomJS
using OpenQA.Selenium.PhantomJS;
IWebDriver driver = new PhantomJSDriver();
// NuGet: Selenium.WebDriver.IEDriver
using OpenQA.Selenium.IE;
IWebDriver driver = new InternetExplorerDriver();
// NuGet: Selenium.WebDriver.EdgeDriver
using OpenQA.Selenium.Edge;
IWebDriver driver = new EdgeDriver();
4.2) Locators
this.driver.FindElement(By.ClassName("className"));
this.driver.FindElement(By.CssSelector("css"));
this.driver.FindElement(By.Id("id"));
this.driver.FindElement(By.LinkText("text"));
this.driver.FindElement(By.Name("name"));
this.driver.FindElement(By.PartialLinkText("pText"));
this.driver.FindElement(By.TagName("input"));
this.driver.FindElement(By.XPath("//*[@id='editor']"));
// Find multiple elements
IReadOnlyCollection<IWebElement> anchors = this.driver.FindElements(By.TagName("a"));
// Search for an element inside another
var div = this.driver.FindElement(By.TagName("div")).FindElement(By.TagName("a"));
// Drag and Drop
IWebElement element =
driver.FindElement(By.XPath("//*[@id='project']/p[1]/div/div[2]"));
Actions move = new Actions(driver);
move.DragAndDropToOffset(element, 30, 0).Perform();
// How to check if an element is visible
Assert.IsTrue(driver.FindElement(By.XPath("//*[@id='tve_editor']/div")).Displayed);
// Upload a file
IWebElement element = driver.FindElement(By.Id("RadUpload1file0"));
String filePath = @"D:WebDriver.Series.TestsWebDriver.xml";
element.SendKeys(filePath);
// Scroll focus to control
IWebElement link = driver.FindElement(By.PartialLinkText("Previous post"));
string js = string.Format("window.scroll(0, {0});", link.Location.Y);
((IJavaScriptExecutor)driver).ExecuteScript(js);
link.Click();
// Taking an element screenshot
IWebElement element = driver.FindElement(By.XPath("//*[@id='tve_editor']/div"));
var cropArea = new Rectangle(element.Location, element.Size);
var bitmap = bmpScreen.Clone(cropArea, bmpScreen.PixelFormat);
bitmap.Save(fileName);
// Focus on a control
IWebElement link = driver.FindElement(By.PartialLinkText("Previous post"));
// Wait for visibility of an element
WebDriverWait wait = new WebDriverWait(driver, TimeSpan.FromSeconds(30));
wait.Until(ExpectedConditions.VisibilityOfAllElementsLocatedBy(
By.XPath("//*[@id='tve_editor']/div[2]/div[2]/div/div")));
4.5) 기본 크롬 브라우저 처리
// Navigate to a page
this.driver.Navigate().GoToUrl(@"http://google.com");
// Get the title of the page
string title = this.driver.Title;
// Get the current URL
string url = this.driver.Url;
// Get the current page HTML source
string html = this.driver.PageSource;
4.6) 고급 크롬 브라우저 처리
// Handle JavaScript pop-ups
IAlert a = driver.SwitchTo().Alert();
a.Accept();
a.Dismiss();
// Switch between browser windows or tabs
ReadOnlyCollection<string> windowHandles = driver.WindowHandles;
string firstTab = windowHandles.First();
string lastTab = windowHandles.Last();
driver.SwitchTo().Window(lastTab);
// Navigation history
this.driver.Navigate().Back();
this.driver.Navigate().Refresh();
this.driver.Navigate().Forward();
// Option 1.
link.SendKeys(string.Empty);
// Option 2.
((IJavaScriptExecutor)driver).ExecuteScript("arguments[0].focus();", link);
// Maximize window
this.driver.Manage().Window.Maximize();
// Add a new cookie
Cookie cookie = new OpenQA.Selenium.Cookie("key", "value");
this.driver.Manage().Cookies.AddCookie(cookie);
// Get all cookies
var cookies = this.driver.Manage().Cookies.AllCookies;
// Delete a cookie by name
this.driver.Manage().Cookies.DeleteCookieNamed("CookieName");
// Delete all cookies
this.driver.Manage().Cookies.DeleteAllCookies();
//Taking a full-screen screenshot
Screenshot screenshot = ((ITakesScreenshot)driver).GetScreenshot();
screenshot.SaveAsFile(@"pathToImage", ImageFormat.Png);
// Wait until a page is fully loaded via JavaScript
WebDriverWait wait = new WebDriverWait(this.driver, TimeSpan.FromSeconds(30));
wait.Until((x) =>
{
    return ((IJavaScriptExecutor)this.driver).ExecuteScript("return document.readyState").Equals("complete");
});
// Switch to frames
this.driver.SwitchTo().Frame(1);
this.driver.SwitchTo().Frame("frameName");
IWebElement element = this.driver.FindElement(By.Id("id"));
this.driver.SwitchTo().Frame(element);
// Switch to the default document
this.driver.SwitchTo().DefaultContent();
JSON_QUERY와 JSON_VALUE의 차이점 JSON_QUERY와 JSON_VALUE의 예제와 비교합니다. JSON_ARRAY 나열된 값이 포함 된 JSON 배열을 반환합니다. JSON_ARRAY_APPEND JSON 문서 내에서 주어진 배열의 끝에 값을 추가합니다. JSON_ARRAY_INSERT JSON 문서에 값을 삽입합니다. JSON_COMPACT 불필요한 모든 공간을 제거하여 json 문서가 가능한 한 짧습니다. JSON_CONTAINS 지정된 JSON 문서 또는 문서 내의 지정된 경로에서 값을 찾을 수 있는지 여부 JSON_CONTAINS_PATH 지정된 JSON 문서에 지정된 경로의 데이터가 있는지 여부를 나타냅니다. JSON_DEPTH JSON 문서의 최대 깊이. JSON_DETAILED 중첩 구조를 강조하는 가장 이해하기 쉬운 방식으로 JSON을 나타냅니다. JSON_EXISTS 지정된 데이터에 지정된 JSON 값이 있는지 확인합니다. JSON_EXTRACT JSON 문서에서 데이터를 추출합니다. JSON_INSERT JSON 문서에 데이터를 삽입합니다. JSON_KEYS JSON 객체의 최상위 값에서 키를 반환하거나 경로에서 최상위 키를 반환합니다. MariaDB [test]> select id, json_keys(data) from json_test; +------+-----------------------------------+ | id | json_keys(data) | +------+-----------------------------------+ | 1 | ["Name", "Sex", "Phone"] | | 2 | ["Name", "Sex", "Phone", "Birth"] | | 3 | ["Name", "Sex", "Phone", "Birth"] | | 4 | NULL | | 5 | NULL | +------+-----------------------------------+ 5 rows in set (0.000 sec)
JSON_LENGTH JSON 문서의 길이 또는 문서 내 값의 길이를 반환합니다. JSON_LOOSE 더 읽기 쉽게 보이도록 JSON 문서에 공백을 추가합니다. JSON_MERGE 주어진 JSON 문서를 병합합니다. JSON_MERGE_PATCH 주어진 JSON 문서의 RFC 7396 호환 병합 JSON_MERGE_PRESERVE JSON_MERGE의 동의어 JSON_OBJECT 주어진 키 / 값 쌍을 포함하는 JSON 객체를 반환합니다. JSON_QUERY JSON 문서가 주어지면 경로로 지정된 객체 또는 배열을 반환합니다. JSON_QUOTE 문자열을 JSON 값으로 인용합니다. JSON_REMOVE JSON 문서에서 데이터를 제거합니다. JSON_REPLACE JSON 문서에서 기존 값을 바꿉니다. JSON_SEARCH JSON 문서 내에서 지정된 문자열의 경로를 반환합니다. JSON_SET JSON 문서에 데이터를 업데이트하거나 삽입합니다. JSON_TYPE JSON 값의 유형을 반환합니다. JSON_UNQUOTE JSON 값을 인용 해제하여 문자열을 반환합니다. JSON_VALID 값이 유효한 JSON 문서인지 여부 JSON_VALUE JSON 문서가 주어지면 지정된 스칼라를 반환합니다.