Model Registry는 MLflow 프로젝트 실행을 통해 나온 결과물인 모델을 저장하는 중앙 집중식 모델 저장소다. MLflow로 모델을 기록했다면, 기록한 모델을 Model Registry에 등록할 수 있고, 등록된 모델은 어디서든 불러올 수 있다.
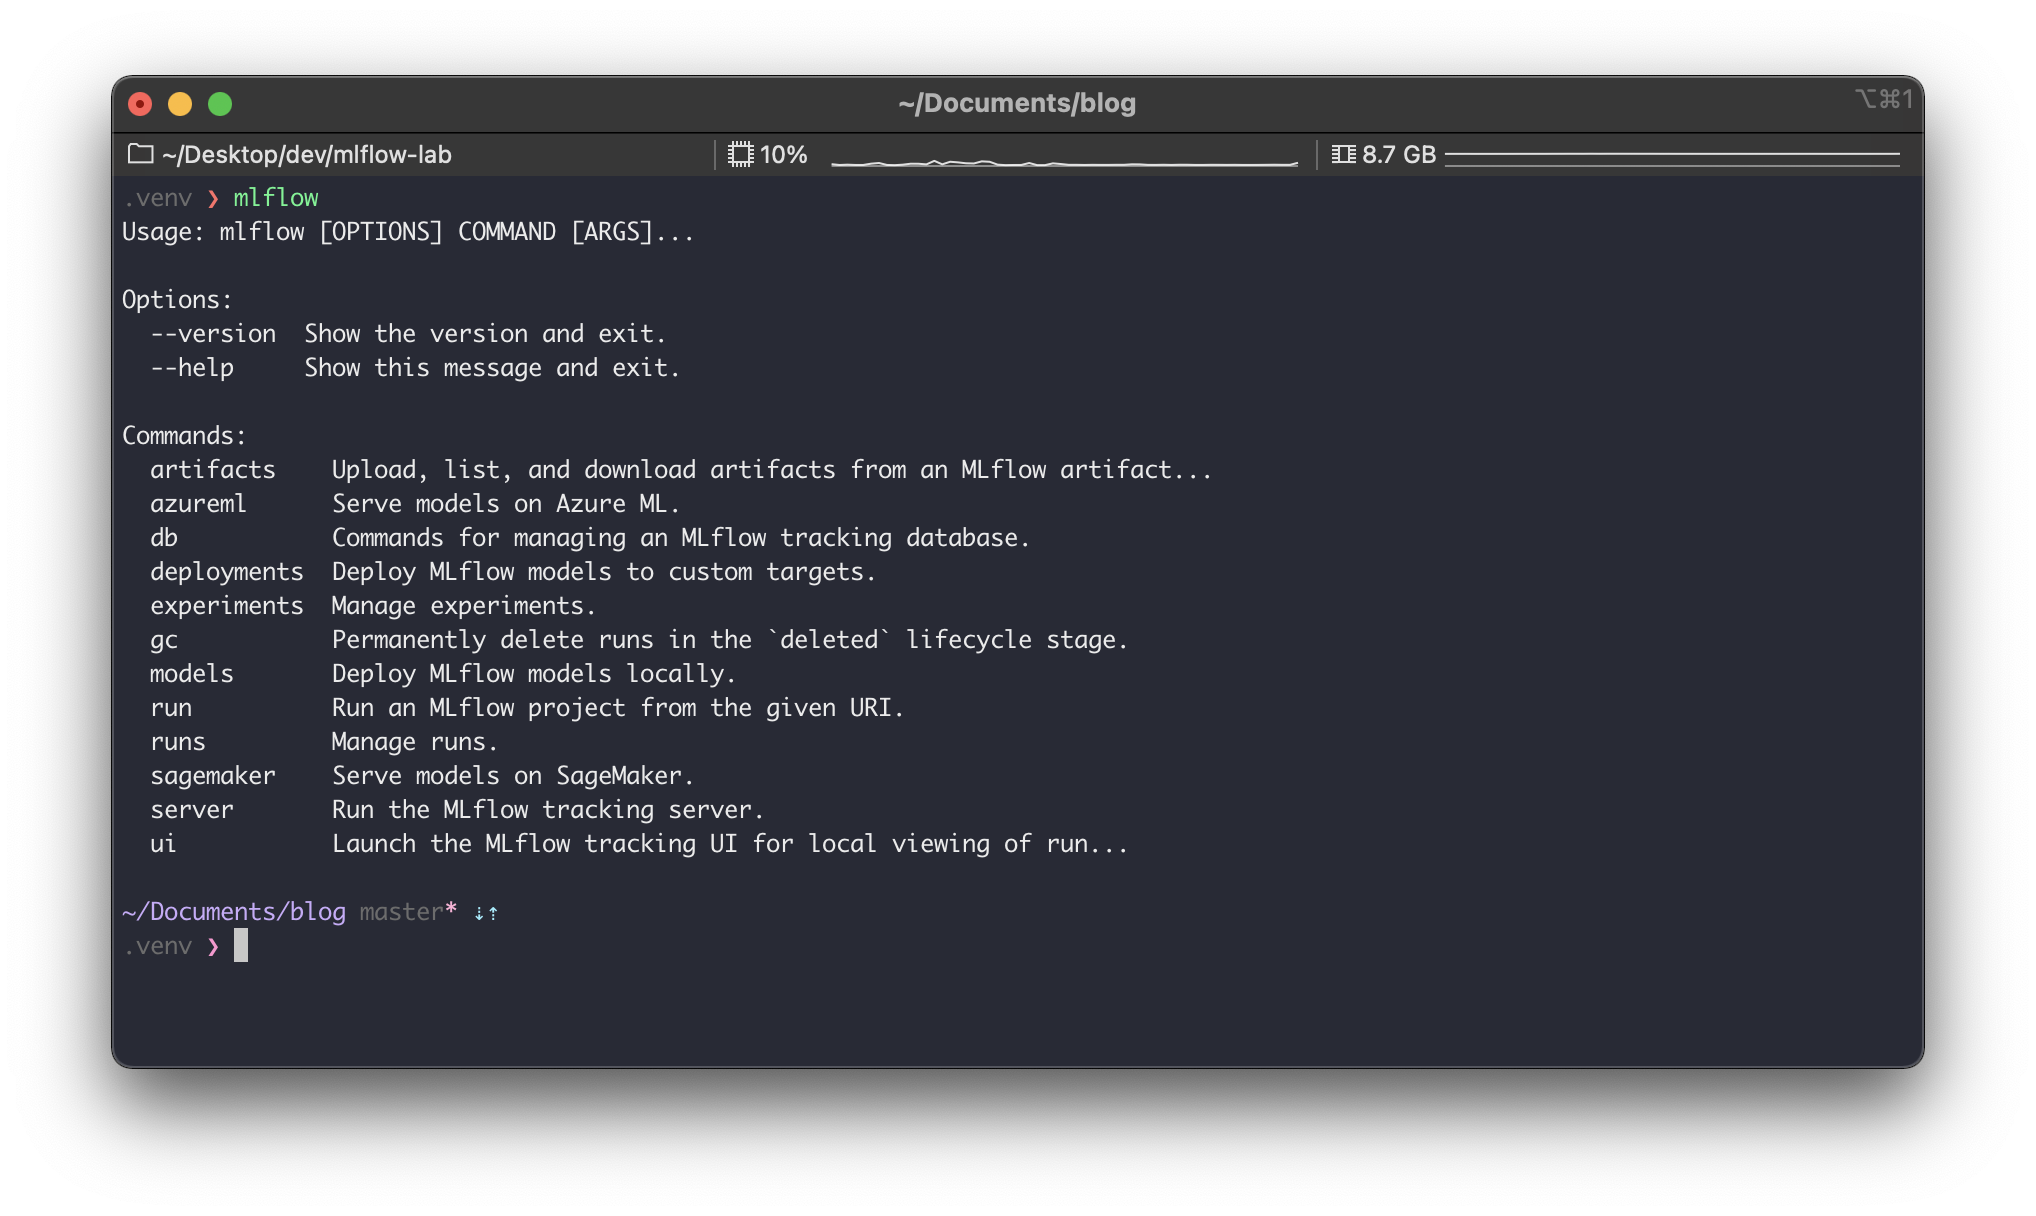
모델 등록하기
웹 UI로 등록하기
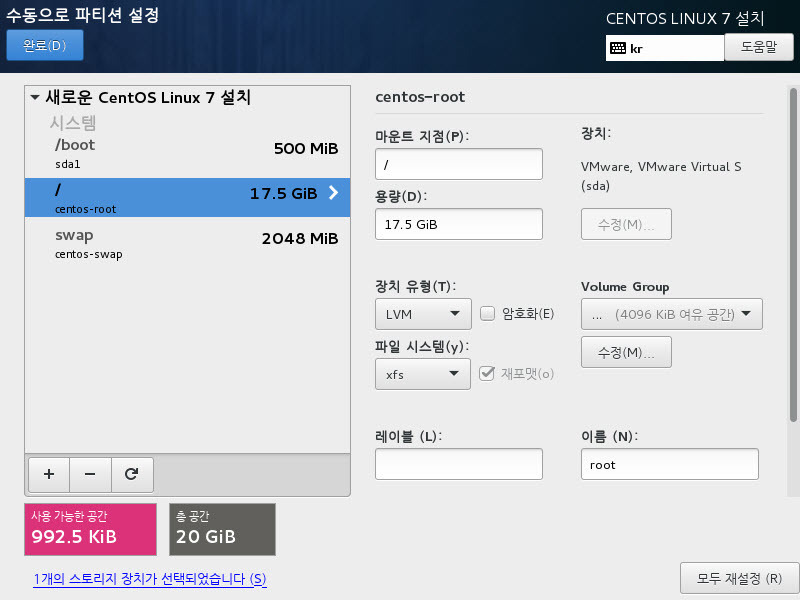
간단하게 모델을 등록해보자. 직전 글에서 사용한 실습을 그대로 이어간다. 웹 서버 (Tracking Server) 에 들어간 뒤, 실행했던 실행(Run)을 클릭하여 들어간다.
실행 상세페이지 하단에 Artifacts 블록이 있고 이 안에Model Register버튼이 있다.
버튼을 클릭하여 다음처럼LinearRegression이라는 이름으로 모델을 등록해주자.
이제 상단 메뉴 중에 Model 탭에 들어가보면 다음처럼 등록된 모델을 확인할 수 있다. 모델을 처음 등록하는 경우Version 1이 자동으로 추가된다.
등록된 모델 하나를 클릭하면 아래처럼 상세 페이지가 나온다.
모델 버전을 누르면 다음처럼 해당 버전의 상세 페이지로 들어갈 수 있다.
Stage항목에서는 이 모델의 스테이지 상태를Staging,Production,Archived중 하나로 바꿀 수 있다. 아무것도 지정하지 않았을 시 기본 값은None이다.
코드에서 등록하기
위처럼 웹 UI가 아니라 코드에서 직접 등록하는 방법도 있다. 총 3가지 방법이 있는데 첫 번째 방법은mlflow.sklearn.log_model()에registered_model_name의 값을 주는 것이다.
이를 직접 확인하기 위해 이전에 실행했던sklearn_logistic_regression예제의train.py를 다음처럼 수정한다.
# sklearn_logistic_regression/train.py

import numpy as np
from sklearn.linear_model import LogisticRegression

import mlflow
import mlflow.sklearn

if __name__ == "__main__":
    X = np.array([-2, -1, 0, 1, 2, 1]).reshape(-1, 1)
    y = np.array([0, 0, 1, 1, 1, 0])
    lr = LogisticRegression()
    lr.fit(X, y)
    score = lr.score(X, y)
    print("Score: %s" % score)
    mlflow.log_metric("score", score)
    # mlflow.sklearn.log_model(lr, "model")  # before
    mlflow.sklearn.log_model(lr, "model", registered_model_name="LinearRegression")  # after
    print("Model saved in run %s" % mlflow.active_run().info.run_uuid)
바뀐 부분은 딱 한 줄이다.mlflow.sklearn.log_model함수에registered_model_name="LinearRegression"인자를 추가하였다. (이 함수에 자세한 내용은여기서 확인할 수 있다.)
이제 다시 이 MLflow 프로젝트를 실행하자.
$ mlflow run sklearn_logistic_regression --no-conda
로그를 보면LinearRegression이 이미 등록된 모델이므로, 등록된 모델의 새 버전을 만든다고 하고Version 2를 만들었다고 한다. (만약 ``registered_model_name값으로 넘겨준 값이 등록된 모델이 아닌 경우, 모델을 먼저 등록하고Version 1` 을 부여한다.)
웹 UI에 가서 확인해보자.
위처럼LinearRegression모델의Latest Version이Version 2가 된 것을 볼 수 있고, 등록된 모델 상세 페이지에 들어가보면 아래처럼Version 2가 추가된 것을 볼 수 있다.
다른 두 번째 방법으로는mlflow.register_model()를 사용하는 것이다. 이 함수에는model_uri와name인자 값을 넘겨줘야 하는데 예시를 보면 바로 알 수 있다.
result = mlflow.register_model(
    model_uri="runs:/4268cde08c2c4fd08c6257b148ed2977/model",
    name="LinearRegresion"
)
model_uri는run_id와artifacts내에model이 저장된 경로다. name은 등록할 때 사용할 이름이다. 위에서registered_model_name와 같은 개념이다. 좀 더 자세한 사용법은여기를 확인하자.
세 번째 방법은MlflowClient.create_registered_model()와MlflowClient.create_model_version()를 사용하는 것이다. 마찬가지로 예시를 바로 보자.
from mlflow.tracking import MlflowClient

# 모델을 등록한다. 아직 버전이 없기 때문에 비어있다.
client = MlflowClient()
client.create_registered_model("LinearRegression")

# 등록된 모델에 버전을 등록한다.
result = client.create_model_version(
    name="LinearRegression",
    source="artifacts/0/4268cde08c2c4fd08c6257b148ed2977/artifacts/model",
    run_id="4268cde08c2c4fd08c6257b148ed2977"
)
이 정도만 설명해도 어느정도 설명이 된다 생각한다.create_model_version()에 대한 자세한 내용은여기를 확인하자.
등록된 모델 불러오기
Model Registry에 등록된 모델은 어디서든 불러올 수 있다. 위에서 등록한 모델을 불러오는 실습을 해보자.
먼저load_registered_model.py를 만들고 다음 코드를 입력하자.
# load_registered_model.py

import mlflow.pyfunc
import numpy as np

# 가져올 등록된 모델 이름
model_name = "LinearRegression"

# 버전을 기준으로 가져오고 싶을 때
model_version = 2
model = mlflow.pyfunc.load_model(
    model_uri=f"models:/{model_name}/{model_version}"
)

# 단계(stage)를 기준으로 가져오고 싶을 때
# stage = 'Staging'
# model = mlflow.pyfunc.load_model(
#     model_uri=f"models:/{model_name}/{stage}"
# )

X = np.array([[1], [2], [3]])
Y = model.predict(X)
print(Y)
# 파이썬 버전 확인
$ python --version
Python 3.8.7

# mlflow 설치 & 버전 확인
$ pip install mlflow
$ mlflow --version
mlflow, version 1.16.0

# 예제 파일을 위한 mlflow repo clone
$ git clone https://github.com/mlflow/mlflow.git
$ cd mlflow/examples
Tracking Server
Tracking 이란?
이전의 글들을 통해 우리는 MLflow가 머신러닝 프로젝트에서 일종의 "기록" 역할을 하는 것임을 알았다. 여기서 머신러닝의 과정과 결과를 곳곳에서 기록한다는 의미로 "Tracking" 이라는 표현을 사용한다.
Tracking은 실험(Experiment)의 각 실행(Run)에서 일어나고, 구체적으로는 다음 내용들을 기록한다.
코드 버전
MLflow 프로젝트에서 실행 된 경우, 실행에 사용 된 Git 커밋 해시
시작 및 종료 시간
실행 시작 및 종료 시간
소스
매개 변수
메트릭
값이 숫자 인 키-값 측정 항목
각 측정 항목은 실행(run) 과정에서 업데이트 될 수 있으며 (예 : 모델의 손실 함수가 수렴되는 방식을 추적하기 위해) MLflow가 측정 항목의 전체 기록을 기록하고 시각화 할 수 있다.
기본적으로./mlruns이라는 로컬 경로에 이 두 가지를 동시에 저장하고 있다. 하지만 별도의 설정을 통해 이 둘을 별도로 저장할 수 있다. 그리고 이 저장을 위해 Tracking 서버가 필요하다.
Tracking Server
MLflow 는 Tracking 역할을 위한 별도의 서버를 제공한다. 이를 Tracking Server라고 부른다. 이전에는mlflow.log_params,mlflow.log_metrics등을 통해서./mlruns에 바로 기록물을 저장했다면, 이제는 이 백엔드 서버를 통해서 저장하게 된다.
간단하게 바로 실습해보자. 다음 명령어로 Tracking Server를 띄운다.
# 먼저 별도의 디렉토리를 만들고 들어가자.
$ mkdir tracking-server
$ cd tracking-server

# 이후 Tracking Server를 띄우자.
# 참고로, mlflow ui 는 꺼야 한다.
$ mlflow server \
--backend-store-uri sqlite:///mlflow.db \
--default-artifact-root $(pwd)/artifacts
로그가 쭈욱 나오고,localhost:5000에 서버가 떠있는 것을 알 수 있다. --backend-store-uri,--default-artifact-root라는 개념이 나오는데, 일단은 넘어가고 계속 실습을 진행해보자.
이제 MLflow 프로젝트를 실행시켜볼건데 그 전에 프로젝트가 이 백엔드 서버와 통신할 수 있게 설정해준다.
Tracking Server는 Server라는 이름에 맞게 어딘가에 항상 띄워두고 사용하면 될듯 싶다. MLflow project 를 작성하는 실험자는 이 Tracking Server와 통신하도록 세팅해두고 Logging 하면 될듯하고. 이렇게 되면 실험에 대한 모든 기록은 Tracking Server의 웹 대시보드에서 한 눈에 볼 수 있게 된다.
# 파이썬 버전 확인
$ python --version
Python 3.8.7

# mlflow 설치 & 버전 확인
$ pip install mlflow
$ mlflow --version
mlflow, version 1.16.0

# 예제 파일을 위한 mlflow repo clone
$ git clone https://github.com/mlflow/mlflow.git
$ cd mlflow/examples
Experiments & Runs
개념
MLflow에는 크게 실험(Experiment)와 실행(Run)이라는 개념이 있다. 실험은 하나의 주제를 가지는 일종의 '프로젝트'라고 보면 된다. 실행은 이 실험 속에서 진행되는 '시행'이라고 볼 수 있다. 하나의 실험은 여러 개의 실행을 가질 수 있다.
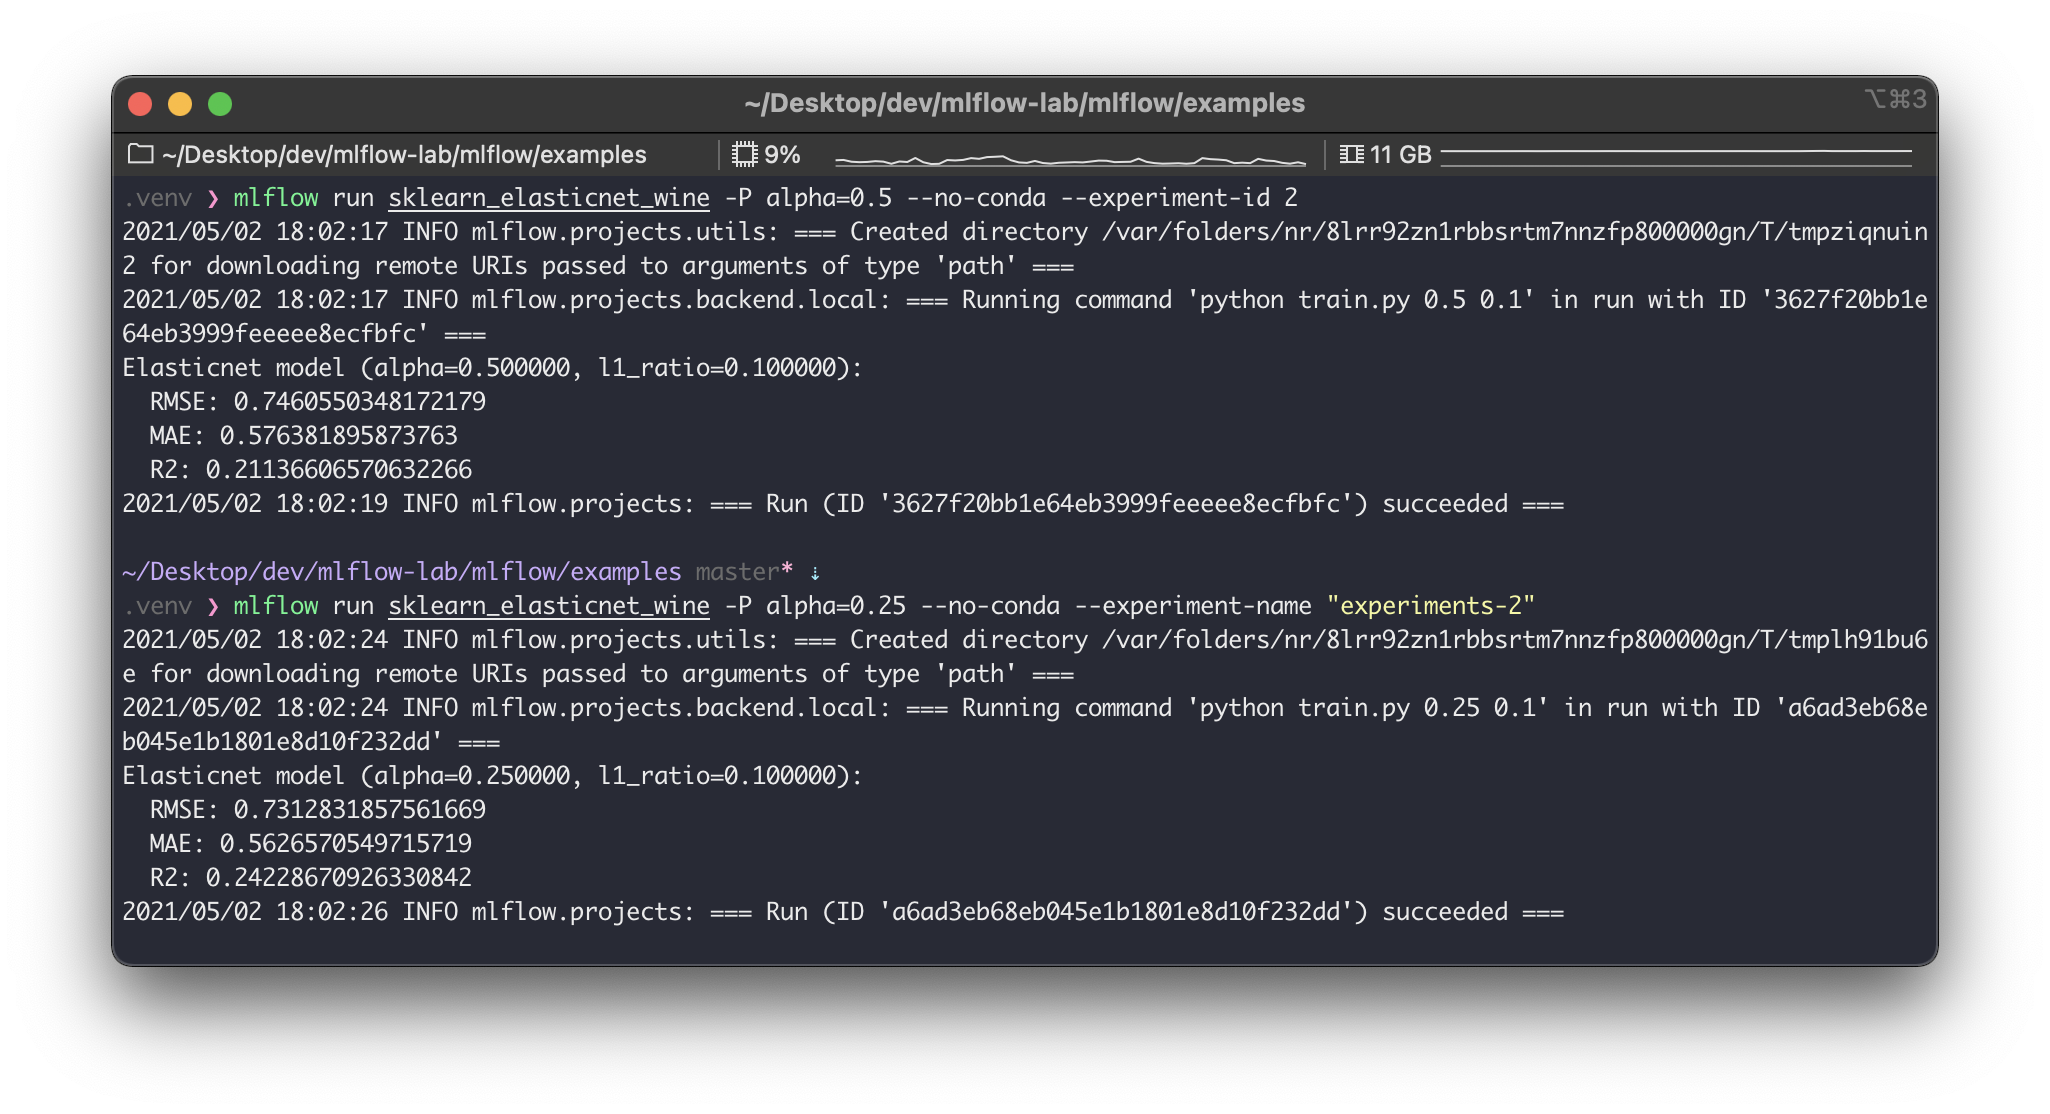
여기서0은 실험 ID이고,a853debd39fb4de4a61ce3aa6d247c8a은 실행 ID다. 한번 더 동일한 프로젝트를 실행해보자. 이번에는 파라미터 값을 추가로 넘겨줘본다.
$ mlflow run sklearn_elasticnet_wine -P alpha=0.5 --no-conda
실행 결과로mlruns경로를 확인해보면 다음과 같다.
0이라는 실행에69c2f00c31044d339344f91ea03ed1f0이라는 실행이 추가로 생성되었다. 이렇듯 매 실행은 하나의 실험에 속하여 들어간다. 위의 예시가 매우 직관적이라 실험과 실행의 관계와 활용 방안을 바로 알 수 있을 것이다.
Experiment 생성 및 조회
위에서 별도의 실험을 생성하지 않았기 때문에 ID가0인 실험을 자동으로 생성하고 이 실험에서 실행을 생성하였다. 이번에는 직접 실험을 생성해보자.
실험 생성 은 다음 CLI 명령어로 가능하다.
$ mlflow experiments create -n "실험 이름"
그리고 실험 목록은 다음 CLI 명령어로 가능하다.
$ mlflow experiments list
그 외mlflow experiments관련된 명령어는 다음의 것들이 있으니 참고하자.
CLI가 아닌 코드에서 experiments 및 run을 다루는 방법
다음처럼mlflow.tracking.MlflowClient를 사용하면 된다.
from mlflow.tracking import MlflowClient

# Create an experiment with a name that is unique and case sensitive.
client = MlflowClient()
experiment_id = client.create_experiment("Social NLP Experiments")
client.set_experiment_tag(experiment_id, "nlp.framework", "Spark NLP")

# Fetch experiment metadata information
experiment = client.get_experiment(experiment_id)
print("Name: {}".format(experiment.name))
print("Experiment_id: {}".format(experiment.experiment_id))
print("Artifact Location: {}".format(experiment.artifact_location))
print("Tags: {}".format(experiment.tags))
print("Lifecycle_stage: {}".format(experiment.lifecycle_stage))
저번 Quick 리뷰 글에 이어 계속해서 작성한다. 이번 글은 MLflow 에서 제공하는 Automatic Logging 기능 예제들을 살펴본다.
사전 준비
다음이 사전에 준비 되어 있어야 한다.
# 파이썬 버전 확인
$ python --version
Python 3.8.7

# mlflow 설치 & 버전 확인
$ pip install mlflow
$ mlflow --version
mlflow, version 1.16.0

# 예제 파일을 위한 mlflow repo clone
$ git clone https://github.com/mlflow/mlflow.git
$ cd mlflow/examples
예제 살펴보기
linear_regression.py
examples내에 있는 많은 예제 중,skelarn_autolog를 사용해보자. 먼저sklearn을 설치해준다.
# sklearn 설치 & 버전 확인
$ pip install sklearn
$ python -c "import sklearn; print(sklearn.__version__)"
0.24.2
skelarn_autolog/linear_regression.py를 보면 다음처럼 생겼다.
# skelarn_autolog/linear_regression.py

from pprint import pprint

import numpy as np
from sklearn.linear_model import LinearRegression

import mlflow
from utils import fetch_logged_data


def main():
    # enable autologging
    mlflow.sklearn.autolog()

    # prepare training data
    X = np.array([[1, 1], [1, 2], [2, 2], [2, 3]])
    y = np.dot(X, np.array([1, 2])) + 3

    # train a model
    model = LinearRegression()
    with mlflow.start_run() as run:
        model.fit(X, y)
        print("Logged data and model in run {}".format(run.info.run_id))

    # show logged data
    for key, data in fetch_logged_data(run.info.run_id).items():
        print("\n---------- logged {} - ---------".format(key))
        pprint(data)


if __name__ == "__main__":
    main()
소스코드가 아주 간결하고 잘 설명되어 있다. 내용은 Linear Regression을 사용하는 간단한 머신러닝 코드다. 여기서는 2가지 코드가 눈에 띈다.
mlflow.sklearn.autolog()
Automatic Logging 기능을 사용하는 설정이다.
코드 앞부분에 들어가야 한다.
with mlflow.start_run() as run:
MLflow 의 실행(run) 의 시작을 알리는 컨텍스트 매니저 구문이다.
run에는 실행과 관련된 내용이 들어간다.
이제 다음 명령어로 실행해보자.
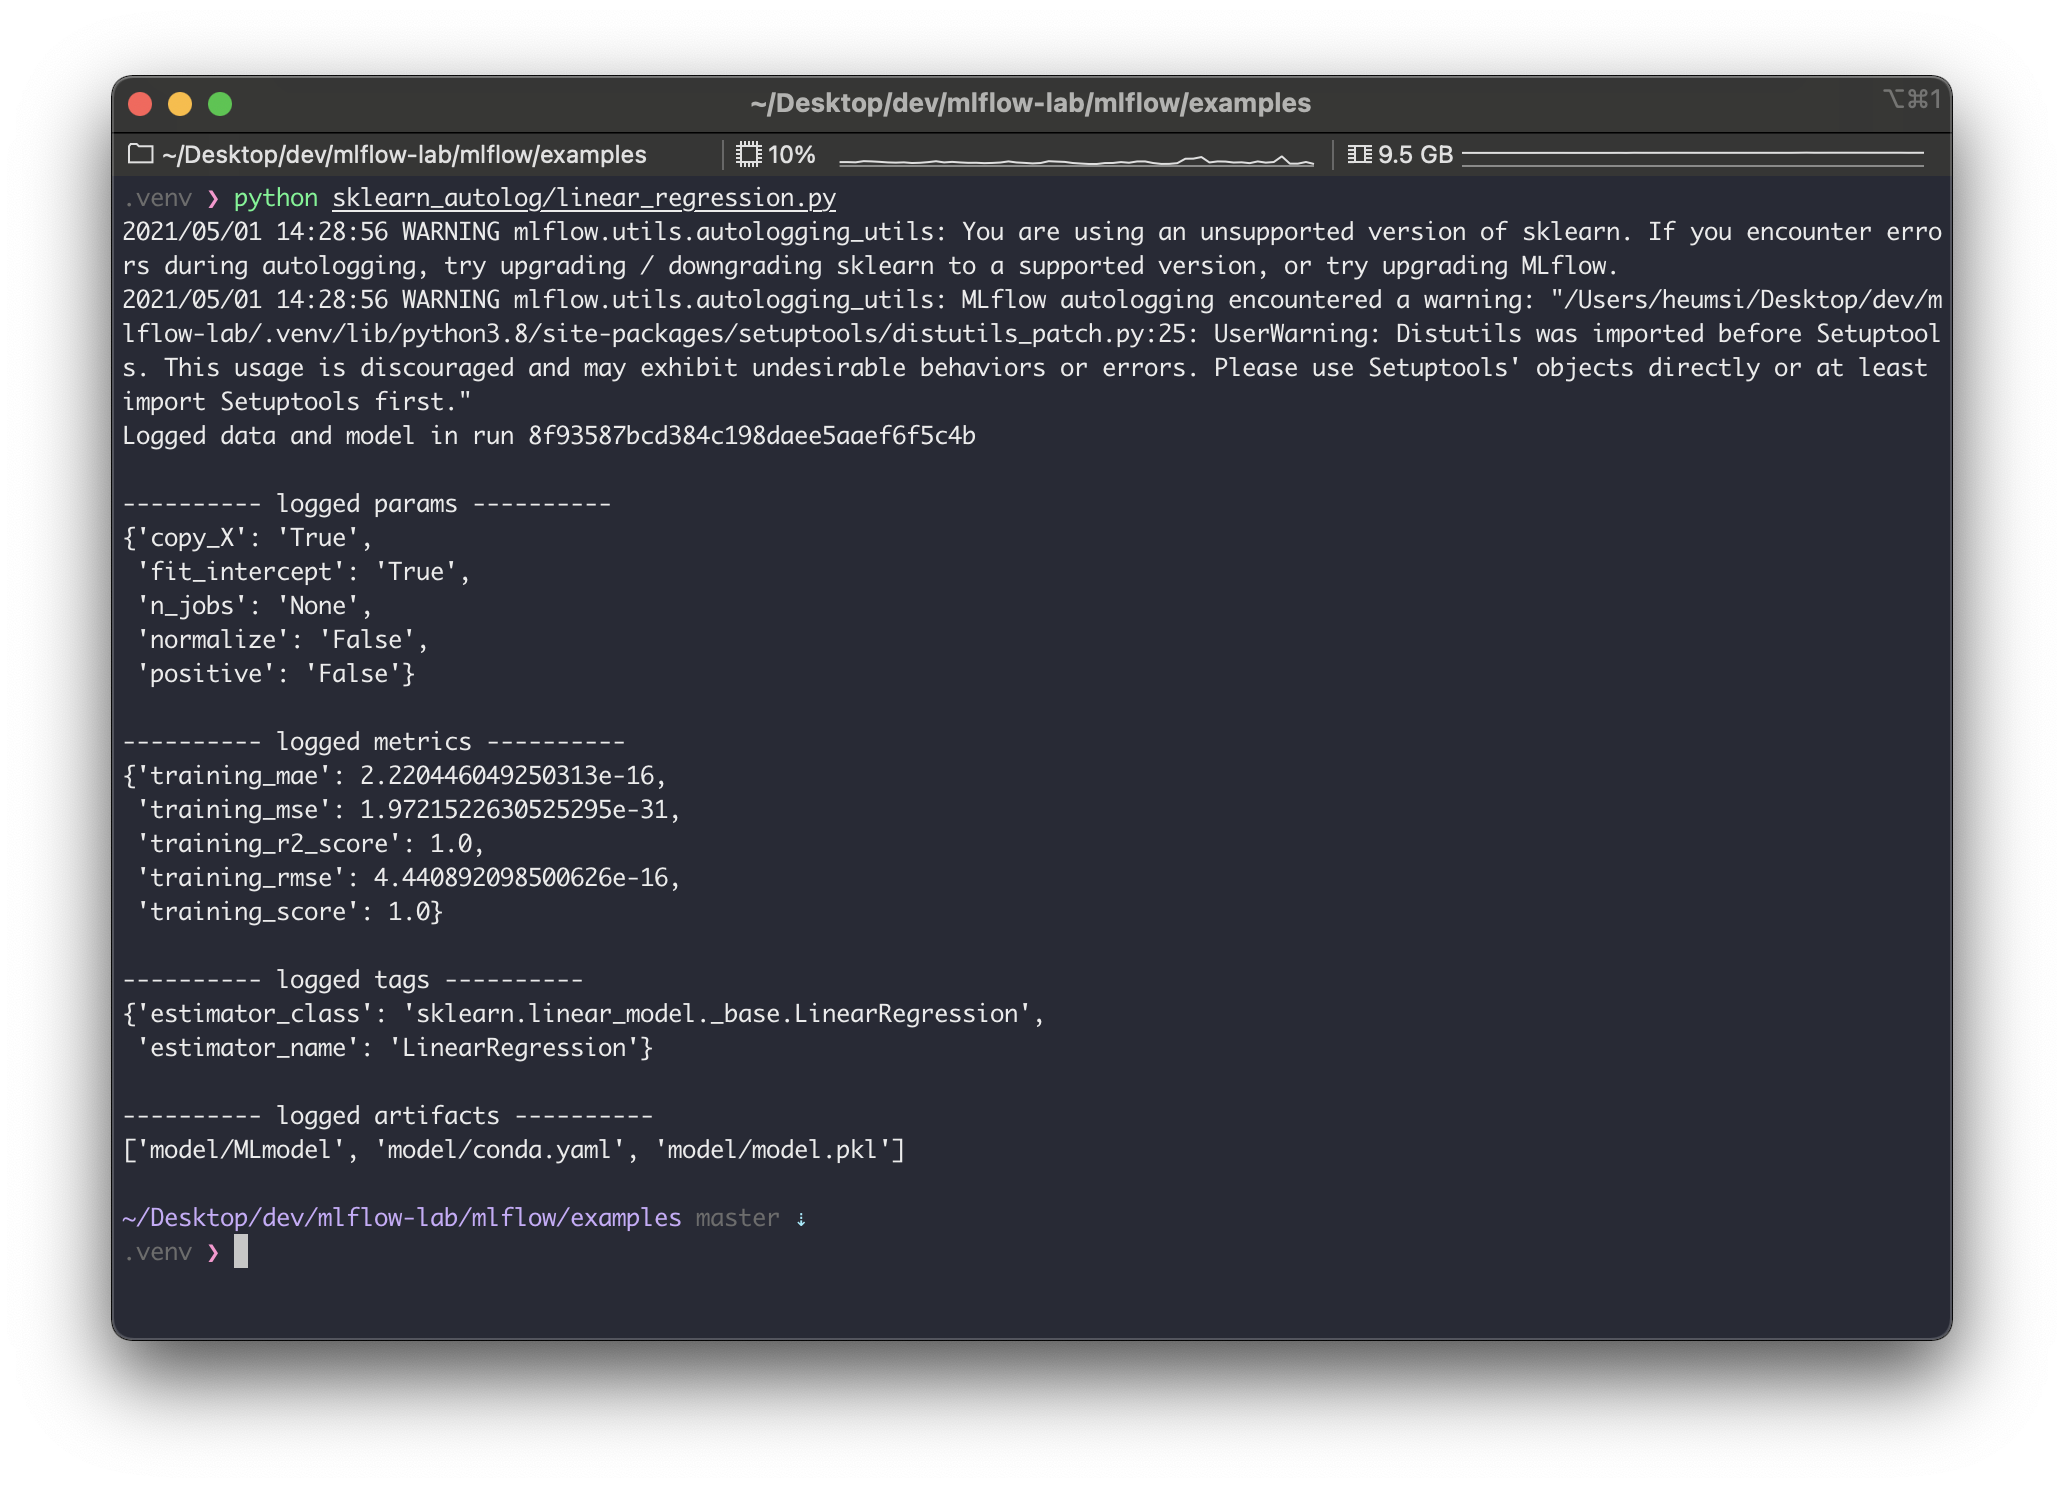
$ python sklearn_autolog/linear_regression.py
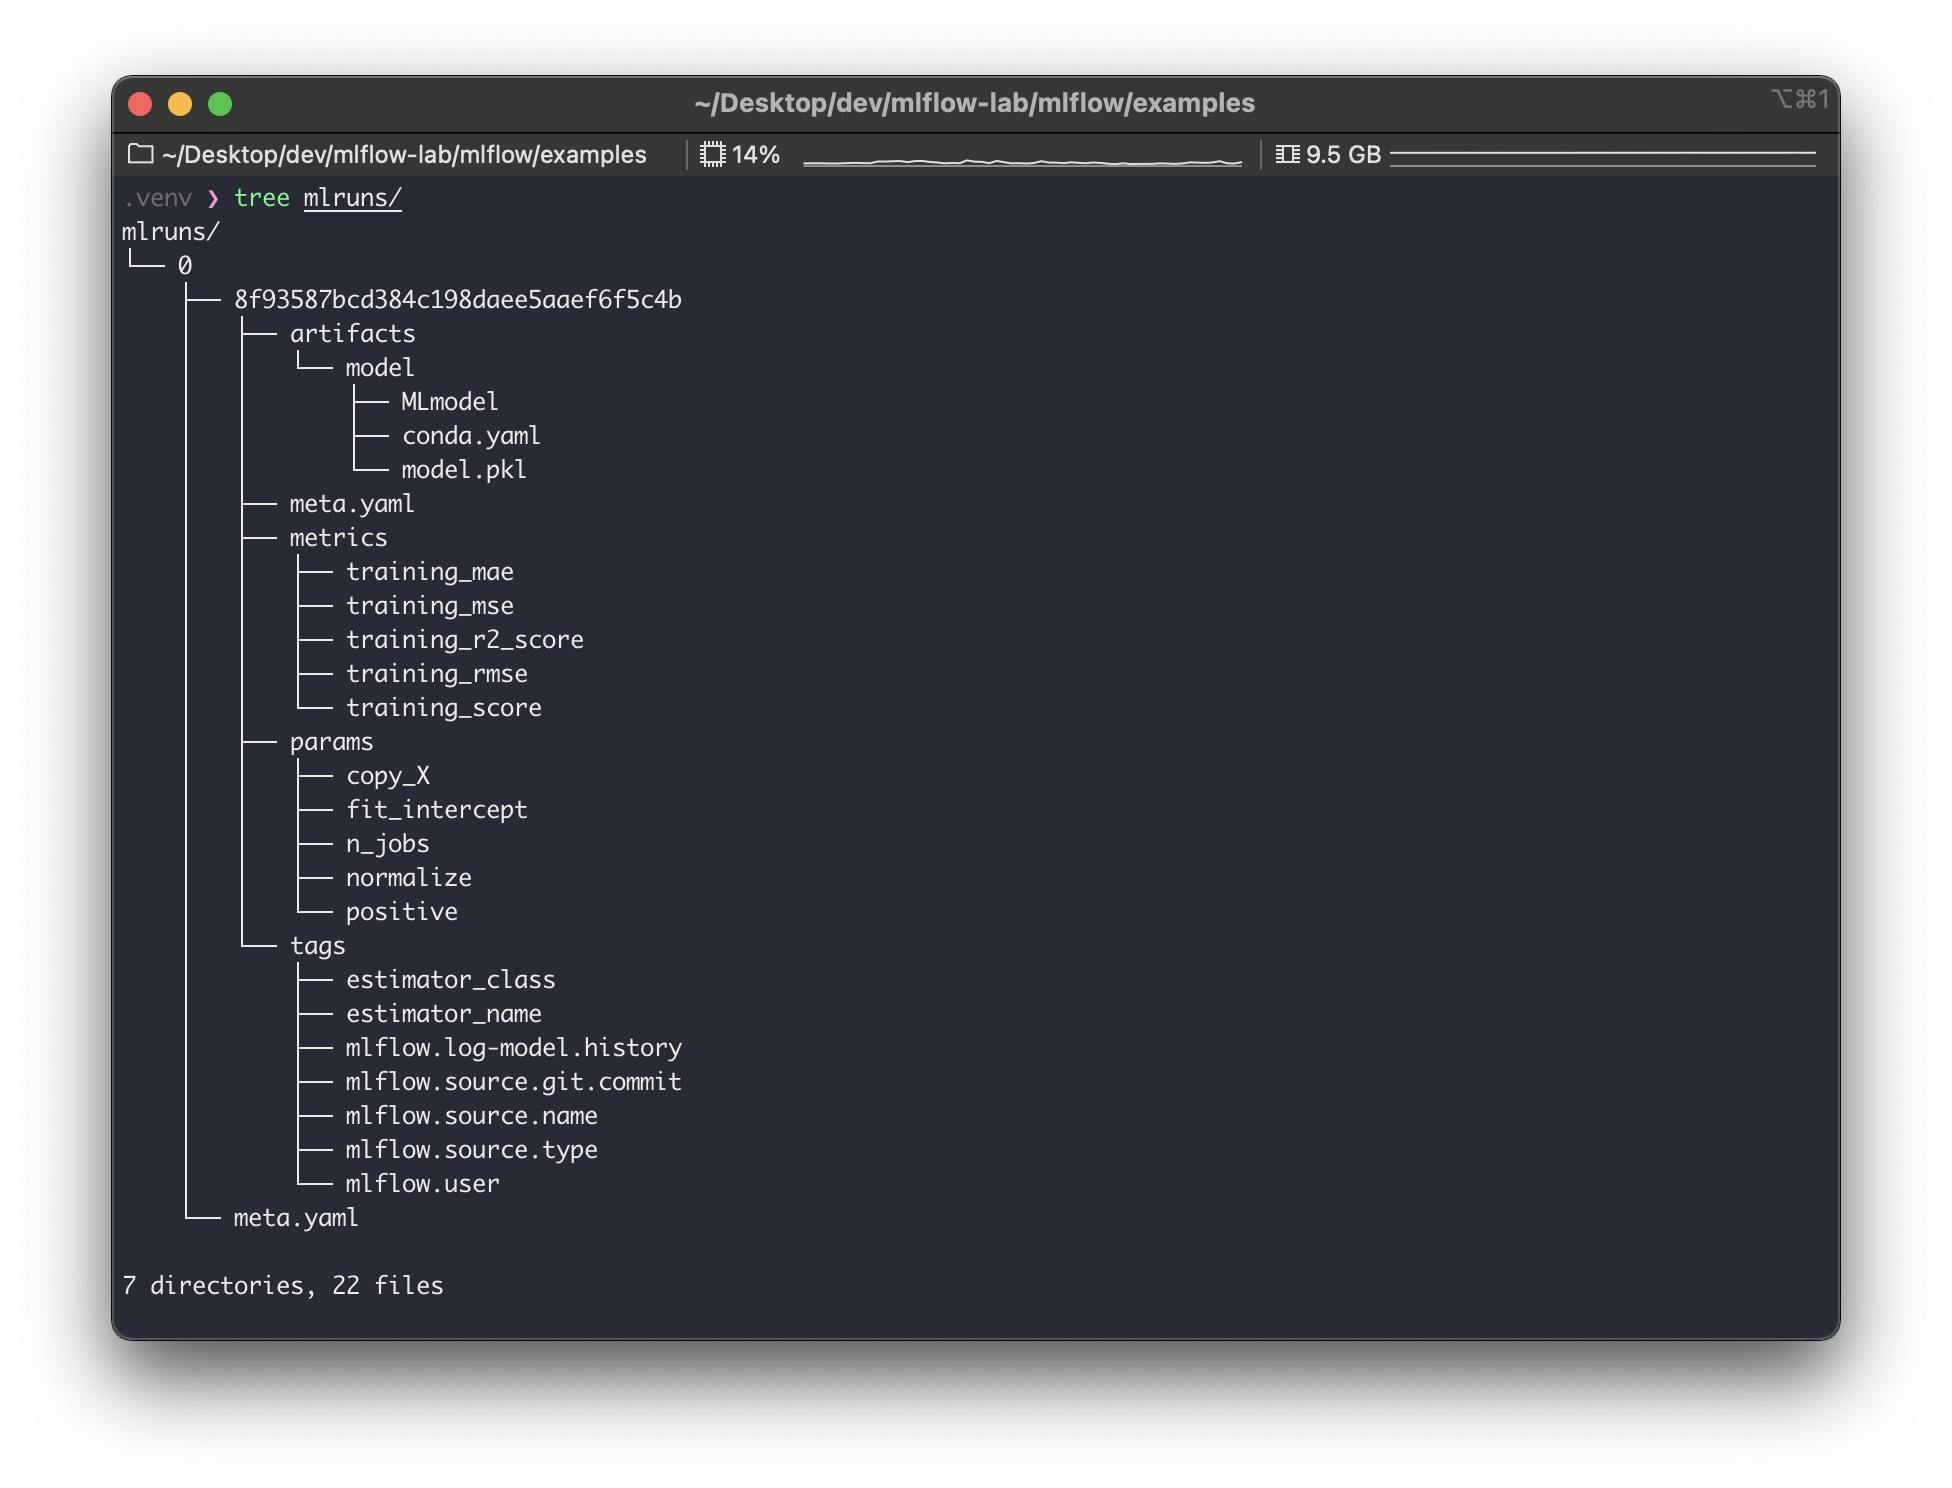
실행하고 나면 위와같은 출력이 나온다. warning은 일단 무시하면 될듯하고.. 로그를 좀 살펴보면,run_id가8f93587bcd384c198daee5aaef6f5c4b로 생성되었고, 다음 사항들이 자동으로 기록한 것을 알 수 있다.
params,metrics,tags등을 좀 더 자세히 확인해보기 위해sklearn모델을 클릭하여 실행 상세 페이지에 들어가보자.
위에서 출력한 내용들이 모두 잘 들어가있는 것을 볼 수 있다.
pipeline.py
이번엔skelarn_autolog/pipeline.py예제를 살펴보자. 이 파일은 다음처럼 생겼다.
from pprint import pprint

import numpy as np
from sklearn.linear_model import LinearRegression
from sklearn.preprocessing import StandardScaler
from sklearn.pipeline import Pipeline

import mlflow
from utils import fetch_logged_data


def main():
    # enable autologging
    mlflow.sklearn.autolog()

    # prepare training data
    X = np.array([[1, 1], [1, 2], [2, 2], [2, 3]])
    y = np.dot(X, np.array([1, 2])) + 3

    # train a model
    pipe = Pipeline([("scaler", StandardScaler()), ("lr", LinearRegression())])
    with mlflow.start_run() as run:
        pipe.fit(X, y)
        print("Logged data and model in run: {}".format(run.info.run_id))

    # show logged data
    for key, data in fetch_logged_data(run.info.run_id).items():
        print("\n---------- logged {} ----------".format(key))
        pprint(data)


if __name__ == "__main__":
    main()
sklearn.pipeline.Pipeline을 사용하는 간단한 머신러닝 코드다. 바로 실행해보자.
$ python sklearn_autolog/pipeline.py
logged_params를 보면Pipeline에 들어가는 모든 파라미터를 기록하는 것을 볼 수 있다. 기록된 값 역시mlruns/에 저장된다.
grid_search_cv.py
마지막으로,skelarn_autolog/grid_search_cv.py예제를 살펴보자. 다음처럼 생겼다.
from pprint import pprint

import pandas as pd
from sklearn import svm, datasets
from sklearn.model_selection import GridSearchCV

import mlflow
from utils import fetch_logged_data


def main():
    mlflow.sklearn.autolog()

    iris = datasets.load_iris()
    parameters = {"kernel": ("linear", "rbf"), "C": [1, 10]}
    svc = svm.SVC()
    clf = GridSearchCV(svc, parameters)

    with mlflow.start_run() as run:
        clf.fit(iris.data, iris.target)

    # show data logged in the parent run
    print("========== parent run ==========")
    for key, data in fetch_logged_data(run.info.run_id).items():
        print("\n---------- logged {} ----------".format(key))
        pprint(data)

    # show data logged in the child runs
    filter_child_runs = "tags.mlflow.parentRunId = '{}'".format(run.info.run_id)
    runs = mlflow.search_runs(filter_string=filter_child_runs)
    param_cols = ["params.{}".format(p) for p in parameters.keys()]
    metric_cols = ["metrics.mean_test_score"]

    print("\n========== child runs ==========\n")
    pd.set_option("display.max_columns", None)  # prevent truncating columns
    print(runs[["run_id", *param_cols, *metric_cols]])


if __name__ == "__main__":
    main()
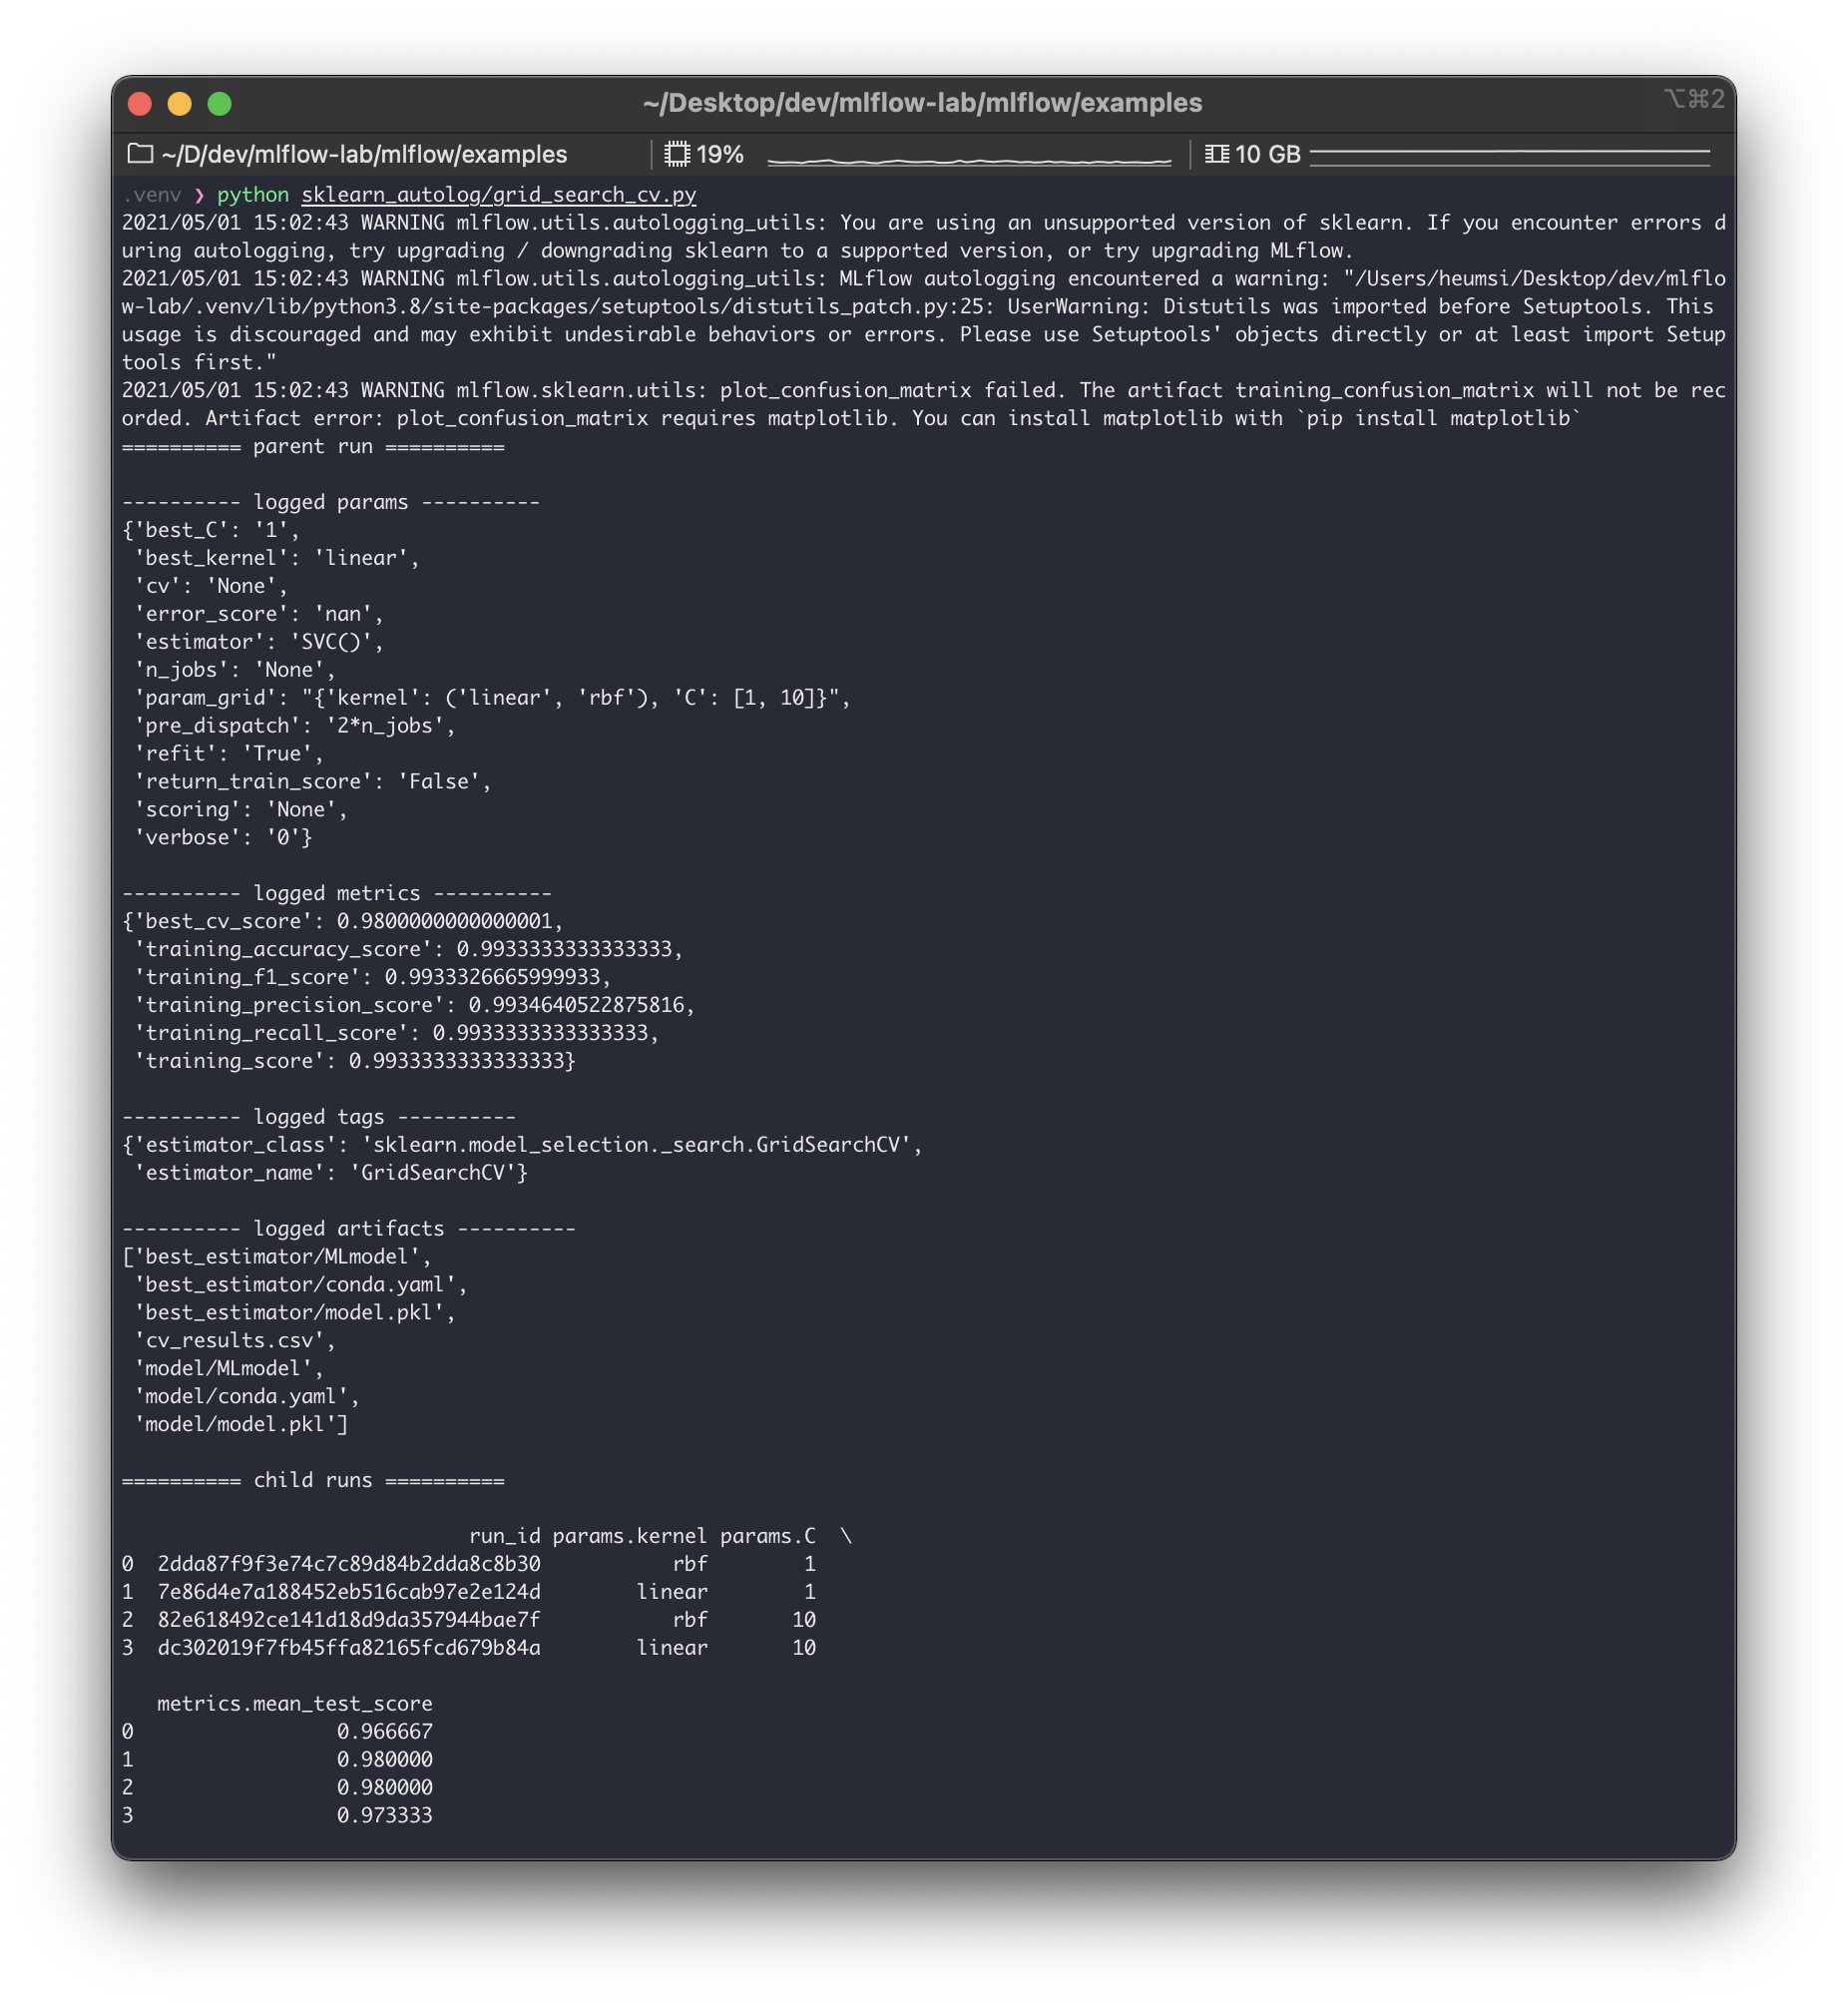
iris데이터셋을 사용하고,svm모델을 사용하는데, 이 때GridSearchCV를 사용하여 최적의 모델 파라미터를 찾는 머신러닝 코드다. # show data logged in the parent run아래 부분은 뭔가 양이 많은데, 그냥 로깅된 내용을 출력해주는 부분이므로, 여기서는 주의 깊게 봐지 않아도 된다.
아무튼 이 코드도 실행해보자.
$ python sklearn_autolog/grid_search_cv.py
출력된 내용을 보면 크게parent run과child runs으로 구성해볼 수 있다. parent run에서는 전체 파이프라인에 들어간 파라미터 값들을 기록하고, 또 이GridSearch를 통해 찾은 최적의 파라미터 값을 기록한다. (best_C,best_kernel). child runs에서는GridSearch진행할 때 각각 파라미터 경우의 수대로run들을 실행하고 기록한 모습을 볼 수 있다. 이 때child runs들도 각각 하나의run이 되므로run_id를 가지게 된다. 즉GridSearch에서 파라미터 조합의 경우의 수가 많아지면, 그만큼의 실행(run) 이 생기게 된다.
실제mlruns를 확인해보면 이child run들이 생긴 것을 볼 수 있다. (다만parent run과 별다른 디렉토리 구분은 없다. 즉 누가child run인지 디렉토리 구조로는 파악이 잘 안된다.)
그렇다면 웹서버에서는 어떻게 보여줄까? 웹서버에서도child run들을parent run들과 구분 없이 보여줄까? 이를 확인하기 위해 웹서버로 접속해서 확인해보자.
재밌게도 웹서버에서는parent run만 보인다. grid_search_cv.py가 있는 행에+버튼을 눌러보면 아래와 같이child runs가 나온다.
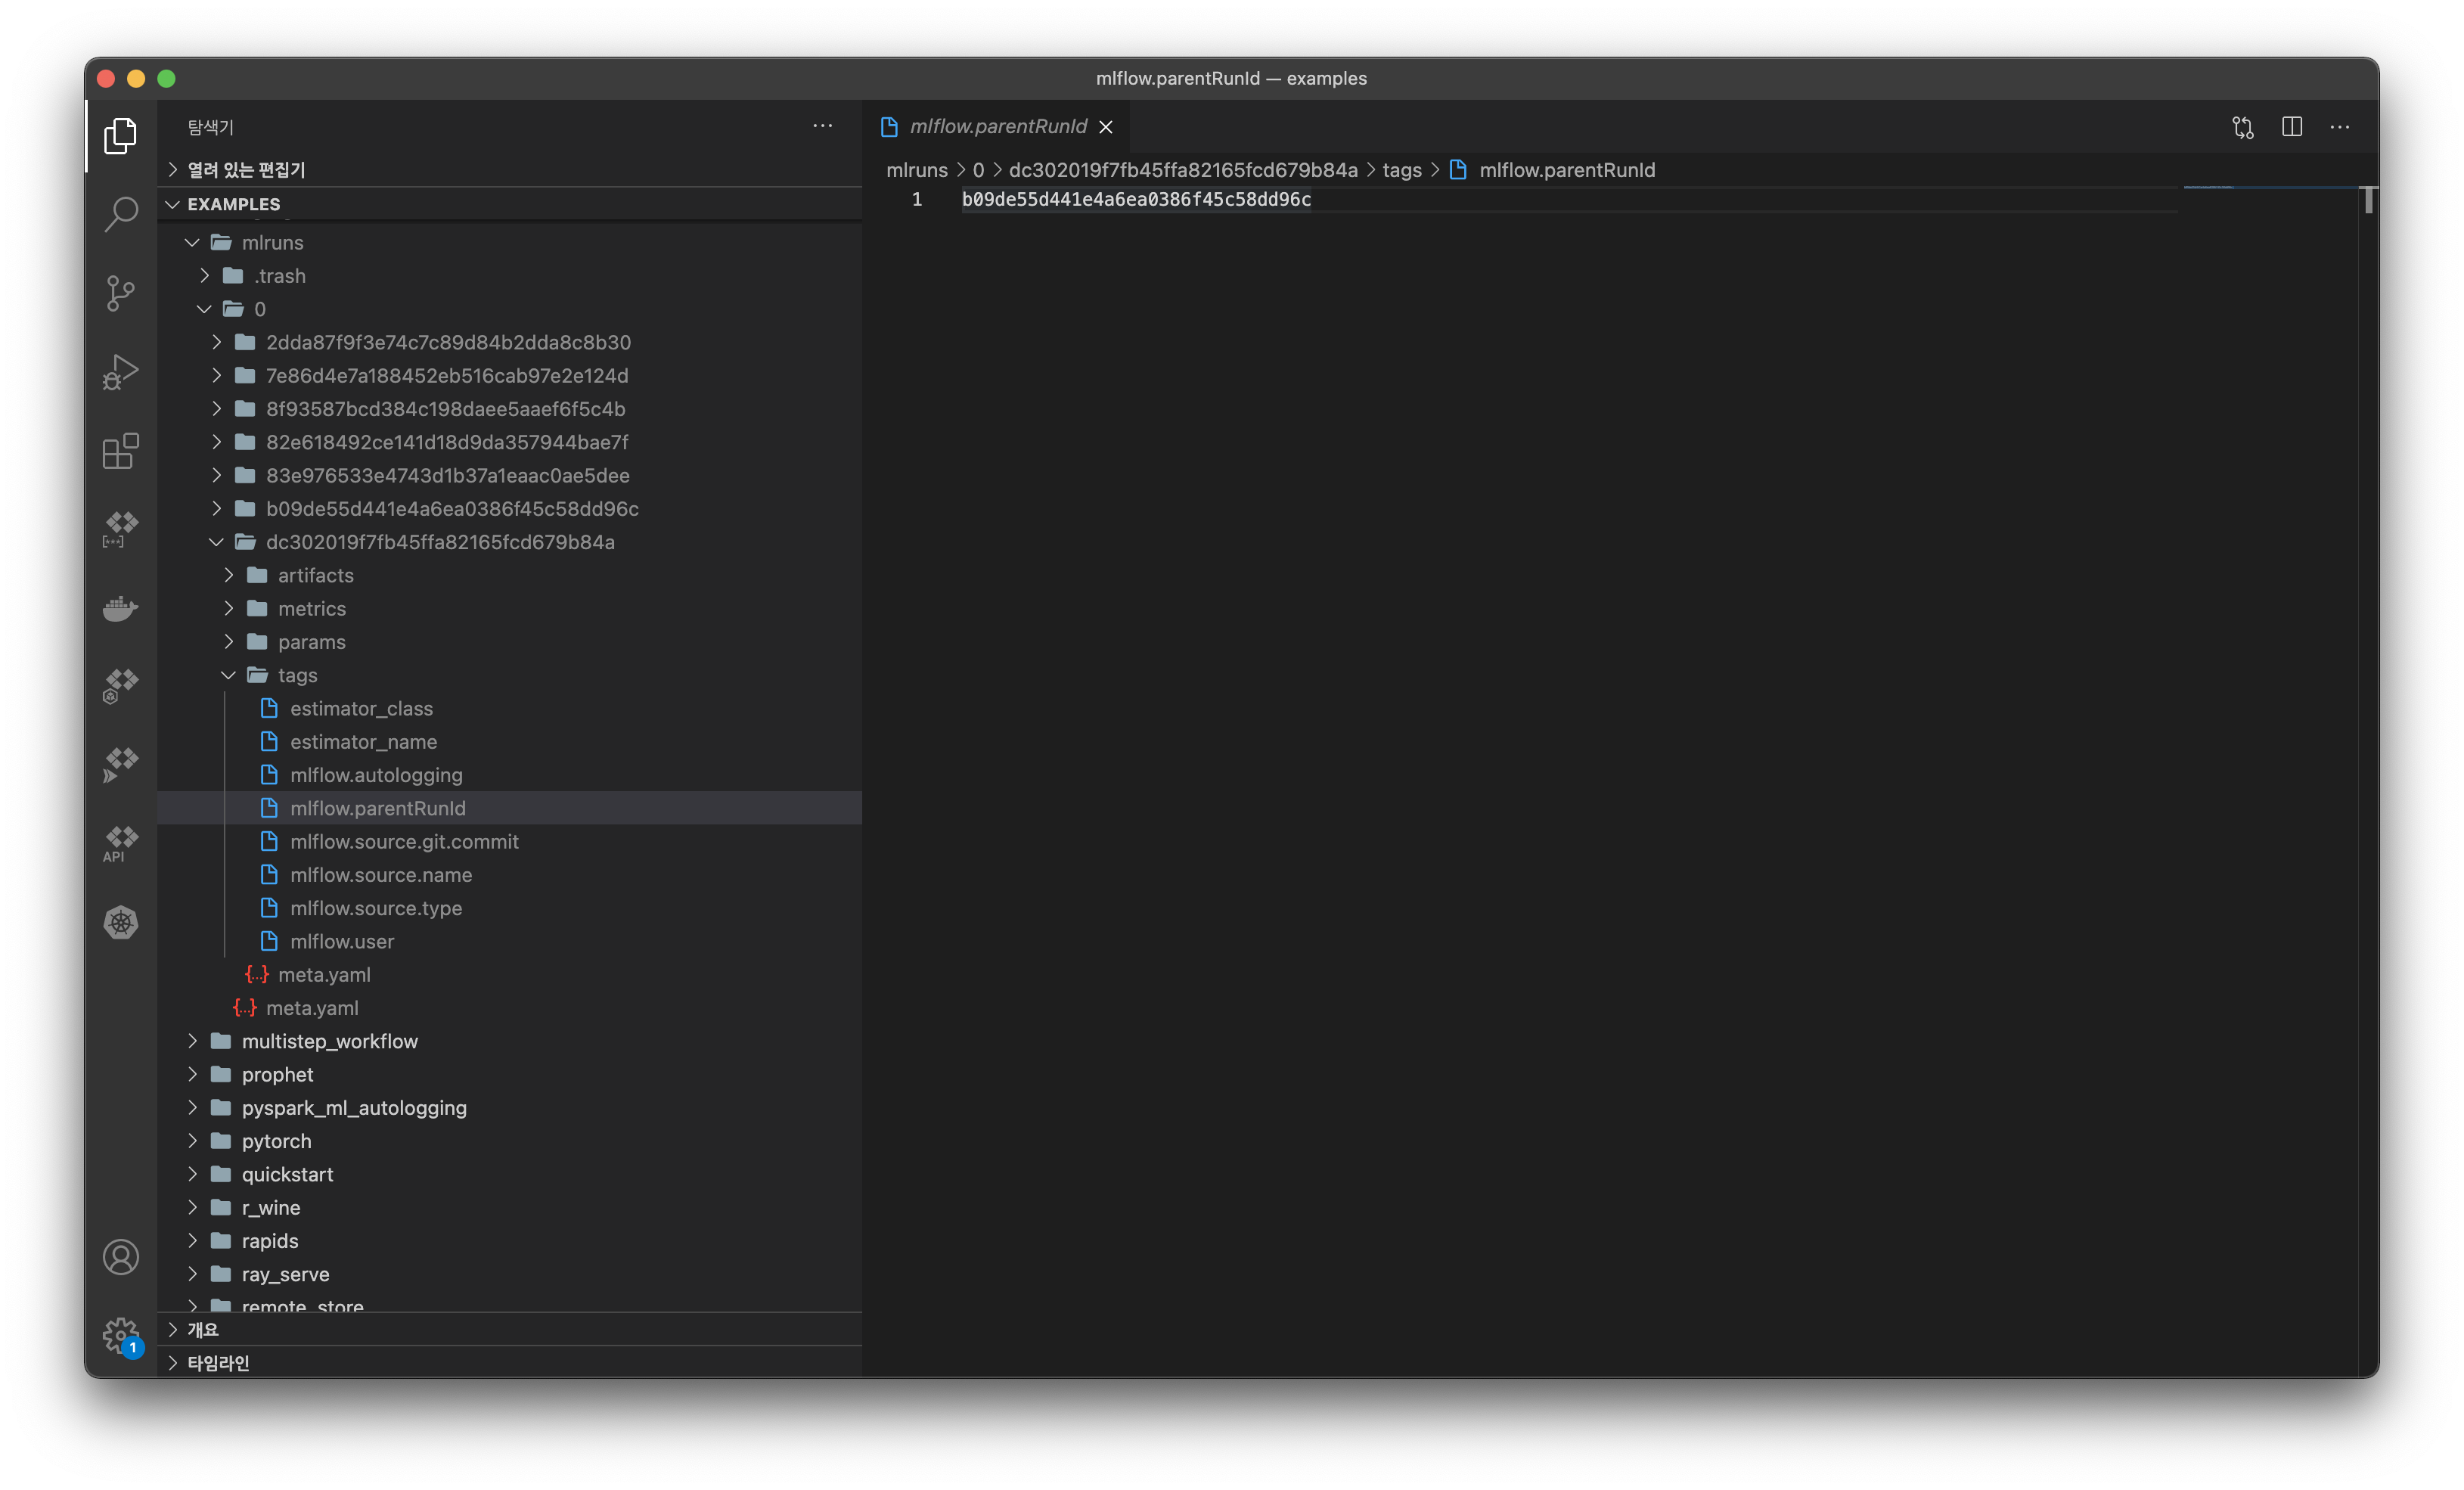
run자체는GridSearch에 맞게 독립적으로 여러 개로 생성하되,run간에 Parent, Child 관계를 가질 수 있는 것이다. parent_run_id로mlruns디렉토리를 검색해보면, 이러한 관계가 어떻게 구성될 수 있는지 알 수 있다.
mlruns에서child run의 디렉토리 구조를 살펴보면tags/mlflow.parentRunId가 있는 것을 볼 수 있다. 그리고 이 파일에 위 사진처럼 부모run_id가 기록되어 있다. (b09de55d441e4a6ea0386f45c58dd96c는dc302019f7fb45ffa82165fcd679b84a의parent run이다.)
그리고child run은artifact과 관련하여 어떤 것도 기록하지 않고,metrics,params,tags만 기록한다.artifacts는 최종적으로 최적화된 모델을 사용하는parent run에서만 기록한다.
정리
mlflow.sklearn.autolog()기능으로 로깅 함수를 쓰지 않아도 자동 로깅을 사용할 수 있다.
MLProject은sklearn_elasticnet_wine에 대한 전체적인 소개와 설정 값들을 담은프로젝트 파일이라 볼 수 있다.
다음으로train.py를 확인해보면
# train.py

import os
import warnings
import sys

import pandas as pd
import numpy as np
from sklearn.metrics import mean_squared_error, mean_absolute_error, r2_score
from sklearn.model_selection import train_test_split
from sklearn.linear_model import ElasticNet
from urllib.parse import urlparse
import mlflow
import mlflow.sklearn

import logging

logging.basicConfig(level=logging.WARN)
logger = logging.getLogger(__name__)


def eval_metrics(actual, pred):
    rmse = np.sqrt(mean_squared_error(actual, pred))
    mae = mean_absolute_error(actual, pred)
    r2 = r2_score(actual, pred)
    return rmse, mae, r2


if __name__ == "__main__":
    warnings.filterwarnings("ignore")
    np.random.seed(40)

    # Read the wine-quality csv file from the URL
    csv_url = (
        "http://archive.ics.uci.edu/ml/machine-learning-databases/wine-quality/winequality-red.csv"
    )
    try:
        data = pd.read_csv(csv_url, sep=";")
    except Exception as e:
        logger.exception(
            "Unable to download training & test CSV, check your internet connection. Error: %s", e
        )

    # Split the data into training and test sets. (0.75, 0.25) split.
    train, test = train_test_split(data)

    # The predicted column is "quality" which is a scalar from [3, 9]
    train_x = train.drop(["quality"], axis=1)
    test_x = test.drop(["quality"], axis=1)
    train_y = train[["quality"]]
    test_y = test[["quality"]]

    alpha = float(sys.argv[1]) if len(sys.argv) > 1 else 0.5
    l1_ratio = float(sys.argv[2]) if len(sys.argv) > 2 else 0.5

    with mlflow.start_run():
        lr = ElasticNet(alpha=alpha, l1_ratio=l1_ratio, random_state=42)
        lr.fit(train_x, train_y)

        predicted_qualities = lr.predict(test_x)

        (rmse, mae, r2) = eval_metrics(test_y, predicted_qualities)

        print("Elasticnet model (alpha=%f, l1_ratio=%f):" % (alpha, l1_ratio))
        print("  RMSE: %s" % rmse)
        print("  MAE: %s" % mae)
        print("  R2: %s" % r2)

        mlflow.log_param("alpha", alpha)
        mlflow.log_param("l1_ratio", l1_ratio)
        mlflow.log_metric("rmse", rmse)
        mlflow.log_metric("r2", r2)
        mlflow.log_metric("mae", mae)

        tracking_url_type_store = urlparse(mlflow.get_tracking_uri()).scheme

        # Model registry does not work with file store
        if tracking_url_type_store != "file":

            # Register the model
            # There are other ways to use the Model Registry, which depends on the use case,
            # please refer to the doc for more information:
            # https://mlflow.org/docs/latest/model-registry.html#api-workflow
            mlflow.sklearn.log_model(lr, "model", registered_model_name="ElasticnetWineModel")
        else:
            mlflow.sklearn.log_model(lr, "model")
전체적으로 머신러닝 모델을 학습하고 테스트하는 코드다. 다만 중간 중간에 다음 함수들이 눈에 띈다.
mlflow.log_param
mlflow.log_metric
mlflow.sklearn.log_model
mlflow의 이 함수들을 사용하여 파라미터 값이나 결과 값을 기록하는 것을 알 수 있다.
이제 이 MLflow 프로젝트를 실행해보자. mlflow run명령어를 사용한다. (참고로 나는 conda 사용안할거기 때문에--no-conda옵션을 주었다)
$ mlflow run sklearn_elasticnet_wine -P alpha=0.5 --no-conda

2021/04/24 14:40:43 INFO mlflow.projects.utils: === Created directory /var/folders/nr/8lrr92zn1rbbsrtm7nnzfp800000gn/T/tmpbdfgejik for downloading remote URIs passed to arguments of type 'path' ===
2021/04/24 14:40:43 INFO mlflow.projects.backend.local: === Running command 'python train.py 0.5 0.1' in run with ID 'f2bec5126785418b9ba84a67a9a86d92' ===
Elasticnet model (alpha=0.500000, l1_ratio=0.100000):
  RMSE: 0.7460550348172179
  MAE: 0.576381895873763
  R2: 0.21136606570632266
2021/04/24 14:40:48 INFO mlflow.projects: === Run (ID 'f2bec5126785418b9ba84a67a9a86d92') succeeded ===
위 명령어를 실행하고 나면 동일 경로에 다음처럼mlruns디렉토리가 생기고, 다음처럼 생겼다.